Somehow, I managed to pocket-dial my way to a factory restore on my Android phone. Yeah... no idea how. Anyway, while I'm quite good at backing things up, I have lost about 10 days worth of journal entries, a few photos, and some GPS tracks. Certainly not the end of the world, but annoying.
So, I figured this is a good time to see what is recoverable from internal storage on an Android device after a format. I'm no expert here, and I'm writing this as a way of taking notes. This isn't intended to be a how-to guide for everyone that's made a foolish mistake. It's not intended to be a complete reference for experts either. It's just what I did while learning how to do it. I write notes as I go, and I figured I might as well share. If you find this useful, then buy me a cup of coffee.
So, surprise, surprise... I've got 24GB of free space in my internal storage. Nice shiny new unconfigured interface, factory default everything except the scratches. Dang!
As I write this, I'm copying said 24GB to an image file on my desktop system. I'll run some recovery tools on that when it's done. Here's how I got to this point:
For some reason, my phone has the option to mount internal storage as an SDcard via USB, but nothing shows up on my Linux desktop. Switching to MTP shows the file system, but that's pretty much useless for me as there's nothing there but what comes stock. By design, the raw storage is not available.
So, I installed the Android Development Toolkit:
sudo apt-get install android-tools-adb
That would show a connection via:
adb devices
but said "insufficient permissions for device"
So, I rooted the device. I wasn't keen on that as any writes to the device risk wiping the data I want to recover, but whatever. I chose KingRoot. Whatever works for your device. That made no difference. Sigh...
I found out that I should restart the ADB service via sudo:
adb kill-server
sudo adb start-server
That worked, I can now run ADB commands against the device.
Next up, I needed to figure out what partition to copy. I used:
adb shell su -c "cat /proc/emmc"
and then:
adb shell su -c "cat /proc/partitions"
to cross-reference the partition for "userdata". In my case, it was /dev/block/mmcblk0p22
Then, I copied the entire partition to my desktop via:
adb shell su -c "dd if=/dev/block/mmcblk0p22" > ~/backup22.image
Anyway, that command is half-way finished now. Considering this will be a 24GB file, from here on in, the commands I run are going to take their sweet time. I'll update this as I go... maybe I'll actually get that 2KB of journal text file recovered, maybe the 20MB of photos, and a few other MB of map tracks. Maybe I won't. At least I've learned a few things already.
Hope this helps...
Update 1:
The first try at capturing the image stopped at 10.1GB. The next ran to 27GB(?). Neither Testdisk nor Photorec managed to get anything useful off either. As well, after having decided to get it over with and factory-reset my phone to get rid of KingRoot, which seems rather invasive, I discovered that pocket-dialling my way to a factory-reset is near impossible. The system is designed to avoid this. Thus, something else must have happened. Maybe, it crashed and scrambled the partitions enough that the phone decided to rebuild the file system? Just guessing at this point. In any event, I've decided to grab everything I can off the phone before doing the reset. Thus:
adb shell su -c "dd if=/dev/block/mmcblk0" > ~/backupAll.image
I'll let that run tonight and see what I can get off it later.
Update 2:
A factory-restore does not remove KingRoot. Apparently, using its own uninstall does. At least it appears to be gone. Note that the above adb shell su ... commands no longer work, so my phone does not come rooted and does require this for access. Still not having any luck with testdisk on the latest dd image.
Showing posts with label Computing. Show all posts
Showing posts with label Computing. Show all posts


2017-01-06
Getting Started with a MonoPrice Select Mini 3D Printer
This post documents my entry into 3D printing via Linux. Obviously, I'm no expert. Rather, this is where I'm recording what I learn along the way. The intent is, more or less, just sharing my study notes. I needed a place to write things down... might as well share. Nothing original here, no great insights, just organising information in a way I find useful so I can find it again. That's all. If you find it useful then buy me a cup of coffee.
This is a living document... Still printing, and starting to figure out the Cura settings. Now experimenting with TPE-80A filament.
I decided to get into 3D printing with a MonoPrice Select Mini 3D Printer. Why? Because it's cheap, because it's getting rave reviews, and because there seems to already be a great community building up around it.
The graphics gcode terminal: Pronterface.py from Printrun. This is used to set some parameters, upload gcode files to the SD card via USB, and can directly print a gcode file as well.
This is a living document... Still printing, and starting to figure out the Cura settings. Now experimenting with TPE-80A filament.
I decided to get into 3D printing with a MonoPrice Select Mini 3D Printer. Why? Because it's cheap, because it's getting rave reviews, and because there seems to already be a great community building up around it.
Background Info:
- The best newbie startup guide I've found so far is here:
http://www.thetylergibson.com/3d-printing-for-the-absolute-beginner-monoprice-select-mini-2/ - The review that set off this particular adventure is here:
http://hackaday.com/2016/06/13/review-monoprice-mp-select-mini-3d-printer/ - The WIKI is here:
http://mpselectmini.com/ - The google Doc:
https://docs.google.com/document/d/1HJaLIcUD4oiIUYu6In7Bxf7WxAOiT3n48RvOe5pvSHk/edit
The Tools:
The slicer: Cura This is the part that takes the model and converts it to printer-specific gcode.
- Install under linux via custom PPA:
sudo add-apt-repository ppa:thopiekar/cura - Update and then sudo apt-get install cura
- Add custom printer to Cura with settings from Tyler Gibson's blog (above).
- Add your material(s) with specifications.
- Apparently, it's possible to import settings from a demo gcode file supplied with the printer. (never bothered). I've learned that it will only do this if the gcode was created by Cura and the versions are compatible.
- Cura's interface is a bit odd and takes some figuring to get the profile info to stick. It also updates daily via the PPA, or so it seems so far. But, it seems to do well as a slicer.
- Linux prep:
sudo apt-get install python python-serial python-wxgtk3.0 python-tk git-core python-pyglet python-psutil python-numpy - Use GIT to get the scripted app:
git clone https://github.com/kliment/Printrun.git - Running via commandline: (seems to require admin privs)
cd Printrun
sudo ./pronterface.py
- Adding a 3D printer model involves going into the 3D Print environment, Other printers, and making some change to any existing printer (like setting it to default). This creates an xml file under %appdata%\Autodesk\Inventor 2017\3DprinterDescriptions.xml. Manually edit that file, duplicating a line, and setting a random GUID and other values as appropriate.
- Download and install Print Studio (a free Autodesk add-on)
- Restart
- At that point, using the 3D Print environment and from there running Print Studio gives various options under the media type (advanced tab).
- Settings do not seem to be quite as fine as with Cura, but there are more options for editing supports.
Fusion 360: The free for hobby/student CAD to gcode option.
- Starting to use this for a variety of reasons. I quite like it actually. It uses the same Print Studio that Inventor does, and I've still not figured it out. Still using Cura.
- I am starting to really like Fusion 360. Even the Render environment is a lot of fun.
Things to do after unpacking the box:
- Update firmware (seems to be 2 halves). Mine is 24.42, newer than the blogs say.
- Enable and configure the WIFI settings. Not yet.
- Change PID setting for printhead temp regulation and, optionally, the table heater regulation. Used Printrun's pronterface to set them to values in Tyler Gibson's blog.
- Apply table covering of choice. (I've bought tape but it appears tablet screen glass protectors are now the rage). Mine came with tape, so I left it. Had to trim off the corners to get at the levelling screws.
- Level table and set print height. Uses the same 4 screws. Mine appears to be slightly crowned, so I set it for the middle. Note that using pronterface to move the table around is way easier than the printer menu and jog wheel.
- Lots of reports of loose screws and connectors, so a once-over may be in order. Didn't bother, feels nice, no odd noises.
- Set up the printer and filament in Cura, mostly as per Tyler Gibson's blog.
- Print the first demo (as specified in the manual) and adjust the print height accordingly. Didn't bother, went straight to printing a token I made in TinkerCAD, exported as an STL, sliced with Cura to gcode, then loaded the gcode into pronterface and told it to print. Came out well. Once it was finished, I raised the bed temperature to 70deg and popped the trinket off. Pictures in a bit.
So, all things considered, it works way easier and better than I had expected. It was, as intended a very easy first print, but still...
I think I'm going to have a lot of fun with this.
Second Print
Feeling lucky, I decided to print a bigger file that I downloaded. A smartphone stand: (3.5 hr print)- I uncompressed the ZIP.
- Loaded the STL into Cura.
- Rotated to print it on its side.
- Chose a "grid" fill for this print as it seemed more sensible.
- Cura said it was nearly a 3hr print. Good enough as a real test.
- Saved the gcode file.
- Loaded the gcode file into Pronterface.
- Connected the printer (in menu - printer was already connected via USB)
- Chose SD from the bar above the model pane.
- Chose to Upload (note the status bar at the bottom that shows progress).
- When done, I used the printer menu to print it.
- I disconnected Pronterface during the print. No untoward effect on the printer.
- The printer is not that noisy, though it gets annoying when everything else is quiet. I actually find it very difficult to sleep with, even in the next room. Just something about the non-regular whistling and lower tones mixing together... no more overnight printing for me.
More Prints
Going great. I'm still printing at what I've found is "medium" resolution, with a layer height of 0.175. No issues with adhesion at the start, and all the prints are turning out better than I had expected. Settings as follows:
- Bed temp of 50deg to print, cranking up to 60deg to separate when done.
- Layer height of 0.175
- Wall thickness set to .8 (x2) for some prints. A bit thin but works. I'd say the finish is a little rougher though.
- Speed is 50, with a wall speed of 25.
Starting to run out of the obvious test things to print so now it's a matter of getting into the editing side. Oh, and I created superfine to superrough profiles in Cura to match the layer thicknesses as suggested in the wiki, with other settings that seem to match (just guessing at this point). The 0.175 seems to be about middle. Haven't tried these alternative settings yet.
My Cura Settings
I'm not recommending these... I've no idea what I'm doing yet, but these are the settings I'm playing with at the moment and needed to write them down. This is as good a place as any. Note that the settings includes a page that makes these settings visible.PLA-SuperFine:
- layer height = 0.0437
- initial layer height = 0.175
- line width (all) = 0.4
- Wall thickness = 0.4 (1 count)
- Top/bot thickness = 0.6
- Top/Bottom Pattern = Concentric
- Infill = 15%
- Pattern = defaulting to grid but may change depending on print
- Printing temp = 210 (pla)
- Printing temp initial layer = 215
- Build plate temp = 50
- Material diam = 1.75mm
- Material flow = 100%
- Enable retraction
- Print speed = 30mm/s
- Infill speed = 30mm/s
- Wall speed = 20mm/s
- Top/Bottom Speed = 15mm/s
- Travel speed = 100mm/s
- Initial Layer speed = 15mm/s
- Skirt/Brim Speed = 15mm/s
- Number of slow layers = 2
- Enable print cooling
- Support = default to off, model dependent
- Build plate adhesion = default to skirt, model dependent
- Skirt minimum length = 350mm
- Print sequence = all at once
PLA-Fine:
- layer height = 0.0875
- initial layer height = 0.2188
- line width (all) = 0.4
- Wall thickness = 0.8 (2 count)
- Top/bot thickness = 0.8
- Top/Bottom Pattern = Concentric
- Infill = 20%
- Pattern = defaulting to grid but may change depending on print
- Printing temp = 210 (pla)
- Printing temp initial layer = 215
- Build plate temp = 50
- Material diam = 1.75mm
- Material flow = 100%
- Enable retraction
- Print speed = 40mm/s
- Infill speed = 40mm/s
- Wall speed = 20mm/s
- Top/Bottom Speed = 20mm/s
- Travel speed = 120mm/s
- Initial Layer speed = 20mm/s
- Skirt/Brim Speed = 20mm/s
- Number of slow layers = 2
- Equalize filament flow
- Enable print cooling
- Support = default to off, model dependent
- Build plate adhesion = default to skirt, model dependent
- Skirt minimum length = 350mm
- Print sequence = all at once
PLA-Normal:
- layer height = 0.175
- initial layer height = 0.3
- line width (all) = 0.4
- Wall thickness = 1.2 (3 count)
- Top/bot thickness = 0.8
- Top/Bottom Pattern = Concentric
- Infill = 20%
- Pattern = defaulting to grid but may change depending on print
- Printing temp = 210 (pla)
- Printing temp initial layer = 215
- Build plate temp = 50
- Material diam = 1.75mm
- Material flow = 100%
- Enable retraction
- Print speed = 50mm/s
- Infill speed = 50mm/s
- Wall speed = 25mm/s
- Top/Bottom Speed = 25mm/s
- Travel speed = 120mm/s
- Initial Layer speed = 25mm/s
- Skirt/Brim Speed = 25mm/s
- Number of slow layers = 2
- Equalize filament flow
- Enable print cooling
- Support = default to off, model dependent
- Build plate adhesion = default to skirt, model dependent
- Skirt minimum length = 350mm
- Print sequence = all at once
PLA-Rough:
- layer height = 0.2625
- initial layer height = 0.3
- line width (all) = 0.4
- Wall thickness = 1.2 (3 count)
- Top/bot thickness = 0.8
- Top/Bottom Pattern = Concentric
- Infill = 20%
- Pattern = defaulting to grid but may change depending on print
- Printing temp = 210 (pla)
- Printing temp initial layer = 215
- Build plate temp = 50
- Material diam = 1.75mm
- Material flow = 100%
- Enable retraction
- Print speed = 60mm/s
- Infill speed = 60mm/s
- Wall speed = 40mm/s
- Top/Bottom Speed = 30mm/s
- Travel speed = 120mm/s
- Initial Layer speed = 30mm/s
- Skirt/Brim Speed = 30mm/s
- Number of slow layers = 2
- Equalize filament flow
- Enable print cooling
- Support = default to off, model dependent
- Build plate adhesion = default to skirt, model dependent
- Skirt minimum length = 350mm
- Print sequence = all at once
PLA-Super Rough:
- layer height = 0.3063
- initial layer height = 0.3063
- line width (all) = 0.4
- Wall thickness = 1.2 (3 count)
- Top/bot thickness = 0.8
- Top/Bottom Pattern = Concentric
- Infill = 15%
- Pattern = defaulting to grid but may change depending on print
- Printing temp = 210 (pla)
- Printing temp initial layer = 215
- Build plate temp = 50
- Material diam = 1.75mm
- Material flow = 100%
- Enable retraction
- Print speed = 75mm/s
- Infill speed = 75mm/s
- Wall speed = 37.5mm/s
- Top/Bottom Speed = 37.5mm/s
- Travel speed = 120mm/s
- Initial Layer speed = 37.5mm/s
- Skirt/Brim Speed = 37.5mm/s
- Number of slow layers = 2
- Equalize filament flow = off
- Enable print cooling
- Support = default to off, model dependent
- Build plate adhesion = default to skirt, model dependent
- Skirt minimum length = 350mm
- Print sequence = all at once
TPE-80A-Normal:
- layer height = 0.175
- initial layer height = 0.3
- line width (all) = 0.4
- Wall thickness = 1.2 (3 count)
- Top/bot thickness = 0.8
- Top/Bottom Pattern = Concentric
- Infill = 40%
- Pattern = defaulting to grid but may change depending on print
- Printing temp = 240
- Printing temp initial layer = 240
- Build plate temp = 0 (using double-sided tape on top of masking tape)
- Material diam = 1.75mm
- Material flow = 100%
- Enable retraction = No
- Print speed = 20mm/s
- Infill speed = 20mm/s
- Wall speed = 20mm/s
- Top/Bottom Speed = 20mm/s
- Travel speed = 60mm/s
- Initial Layer speed = 20mm/s
- Skirt/Brim Speed = 20mm/s
- Number of slow layers = 2
- Equalize filament flow = No
- Enable print cooling
- Support = default to off, model dependent
- Build plate adhesion = default to skirt, model dependent
- Skirt minimum length = 350mm
- Print sequence = all at once
More Printing
Had some failures, mostly with adhesion. I was printing a model downloaded from ThingiVerse, a Dremel nose finger guard, and part of it kept breaking free during the print. I first tried replacing the stock masking tape with some green painter's tape and that was worse. After much futzing around with using brims instead of skirts, adding supports, and sanding the tape, I managed to get a print that stuck. After that, I realised that the tape is way slipperier than regular masking tape. I replaced the tape and had better luck, though still not as good as the factory tape. I've got a couple of iPhone 5S tempered glass screen protectors on the way from China... which are supposed to be the solution to this problem. Time will tell.... (update) and, no. I had no luck with the glass and went back to regular masking tape, sanded a bit, and now with glue stick before each print. Seems to work well enough. I may try the glass with glue stick at some point, but I'll also see if I can find any of that fabled "blue painters tape" everyone keeps mentioning.
Another print, a whistle (another ThingiVerse download) also failed due to adhesion. This time it lifted up on one side from warping, but I let it print through. That was a mistake as... well... it's a whistle and compressing the tube you blow in kind of changes things. Live and learn. Anyway, after my initial success, I've now got a small but growing collection of failed prints. More successful ones as well... that ThingiVerse can be quite addictive and the printer has been working hard. The first roll of filament is noticeably down so I've ordered 2 more PLA. I think I'll avoid ABS until it's warm enough to put the printer outside while printing.
Note that I'm uploading designs and prints on PinShape. No point duplicating the pictures here.
Note that I'm uploading designs and prints on PinShape. No point duplicating the pictures here.
Filaments
I've ordered a 12-roll variety pack from Filament.ca as well as some TPE-80A and Nylon-645. At this point, I've spent more on filament than the printer, which I consider to be a good thing. I'll be working through the various types, seeing how they do, over the next while.TPE-80A Filament
I've been experimenting with this soft filament, somewhat rubber-like though it's not. I'd say if feels like it would make good drive belt material. That kind of strength and texture. Actually, I'd say the filament would be a very useful addition to the toolkit, but it is quite difficult to print with. First off, it is too soft to easily feed down the Bowden tube, instead going out sideways at the feed mechanism. Thus, I had to make a part to fill in the spaces so it couldn't escape. That part is here: MSM MK-IV Space Eraser, on PinShape. Solving that problem, the next issue is that it appears to shrink so much after printing that getting it to stay stuck to the bed is near impossible. After a few failed attempts, I decided to use double-sided carpet tape on top of masking tape (to protect the bed). It stuck quite well to the carpet tape but I still had issues with the carpet tape separating from the masking tape. Yeah, it pulls that hard. The next issue appears to be that it slips when trying to feed directly from the spool, and that causes missing lines in the print. The solution to that will be some kind of ball-bearing roller for the spool. Yes, a lot of hassle, but if I can figure out this filament, the rest should be easy.
Some Pictures
Some downloaded models from Thingiverse and PinShape:

 The surprisingly hard thing to print:


And, some stuff I drew in Inventor and uploaded to PinShape


And, some stuff I drew in Inventor and uploaded to PinShape
Tomy Plarail track bits...


Current Stats:
Nearly 1KG of PLA printed, with about 17% of that as waste. Yeah, I've been keeping all my failures, and supports, in a bag so I can weight it. Just curious.
2016-09-09
Enduro Computer Project
WAIT! Before you start reading and get disappointed, this is my research blog. At this point, there is no enduro computer, it's not finished. If fact, I'm still roughing out the design. It may never get finished. And, it's low priority for me. I'm starting this now because I'm having to work through some technical issues and maybe somebody else might find my notes useful. That's all.
Current status: Pre-Alpha, just planning at this point.
The plan: To set up a 2.4" TFT LCD display shield on an Arduino Uno with a Hall Effect sensor and some code and mount it on the handlebar of my Dirtbike for enduro racing. Total cost should be in the $20 range (and that's probably overestimating).
So, I picked up a 2.4" TFT-LCD touch-screen from Ebay. Absurdly cheap, in the $5 range. It's an Arduino shield for an Uno, and it leaves enough pins for me to run a hall effect sensor, which I'll just salvage from a bicycle speedo (another stupid-cheap Ebay purchase).
Problem 1: Drivers for the TFT-LCD. It appears there are a great many variants of these shields available, and very few come with any kind of documentation or libraries. Most happen to have "www.mcufriend.com" printed on the PCB, so that means very little. That website is in Chinese.
Most of the available drivers I tried for this just left a white screen, though the serial output seemed to work. I did find one, SWTFT, that mostly works. I can run the tftpaint example, except there is a white bar down the side. Running the graphicstest example show that it is trying to write under that white bar, and it is trying to write with a backwards font.
Solution 1: The key is to identify which control chip you have and then get matching drivers. Identify your chip with a utility found here. Open the Serial Monitor in the Arduino IDE to see the information.
The 'calculator' utility makes for a great example to work from. Next thing is to figure out how I want the main display to look, and maybe a few sub-displays.
Problem 2: Using the shield on an Arduino Uno seems to use all the pins. I've read that A2 is not used, but my shield has a label for that pin (LCD_RS) and not using that pin (bending it out of the way... hey, it's a $5 shield) leaves a white screen. The Ebay seller states that "you can use digital pins 2, 3 and analog 4 and 5. Pin 12 is available if not using the micro." Some of those pins are labelled. It will not work with D2 and D3 bent out of contact, so the seller's information is not correct either.
Solution 2: The D0/D1 (RX/TX) pins are not labelled on the shield, bending them out of the way left the display still working fine, along with the touch screen, but I've not yet determined if they're needed for the SDcard. A5 (not labelled) does not seem to be used either. A4 is labelled as the LCD_RST (reset?) and while it will work bent out of the way, I'm not sure if the library is writing to it or not. Of course, switching to a MEGA, instead of an Uno, gives a lot of useful pins... but also left a white screen.
Solution 2a: Using the MEGA is actually fairly simple. Just edit LGDP4535.cpp (in Cee'z library), commenting out the Uno line and uncommenting the MEGA line. '//' means this is a comment.
This says to use a MEGA instead:
#include "mega_24_shield.h"
//#include "uno_24_shield.h"
Don't forget to switch back if you want to use an Uno.
Background: Enduros, for those that don't know, are races where the object is to travel at a set average speed rather than as fast as you can. The trick to winning them is, however, not just riding at that speed but rather as fast as you can at the start of a section, then guessing how far to the next check, and then calculating what time it should be when you get there. Parts of the section are typically very difficult to maintain the correct speed while other parts are easy. Thus, there is a lot of guesswork involved, and math at the same time. It's pretty easy to figure out how far you should have gone in 15 minutes if the speed is 20km/h: 20km/h * 1/4h = 5km. Figuring that out for a speed of 17km/h over 10 minutes: 17km * 1/6h... not so easy when you're crashing through the bush and scrabbling over rocks and roots at speed. Yeah, people actually pay to do that. Crazy people anyway. Even crazier ones pay big money for a handlebar mounted computer to do the math for them. Then, there's cheap and crazy people like me that set out to build their own.
The Interface: There are a lot of different ways to present the needed information but what I think I want for the main display is simply +/-Minutes, as big as I can make them. Negative minutes means I'm ahead of where I should be and have some slack. Positive minutes means I need to run WFO and catch up. It will have 2 on-screen buttons: Error and Check. 'Error' means I've missed a turn, happens a lot in enduros, and need to subtract some distance while I get back to the marked trail. 'Check' marks the clock, displays my results, resets the minutes without resetting the seconds, and lets me set the speed for the next section.
More later...
2016-04-30
My Linux for Kids Notes
This is not a "how to" guide, a definitive list, nor even a recommendation for what to do for your kid. It's simply my notes. I needed to keep them somewhere, I needed a place where I could update them easily, and I wanted it "in the cloud" so I could always find it. Oddly enough, a blog is actually a good place to do this. I don't mind sharing my notes and if you find them useful... good for you. If you have some other recommendations, feel free to comment.
I'll be updating this as I go...
The list of linux apps I install, suitable for cut and paste into a sudo apt-get install command for a debian-based linux distro, because that's how I do it:
Via playonlinux, install:
Other stuff to remember:
* Celestia - no current install candidate.
I'll be updating this as I go...
The list of linux apps I install, suitable for cut and paste into a sudo apt-get install command for a debian-based linux distro, because that's how I do it:
sudo apt-get install gcompris tuxpaint tuxpaint-config tuxmath tuxtype ktuberling stopmotion playonlinux extremetuxracer neverputt pingus funnyboat pysiogame stellarium stellarium-data supertuxkart sugar connectagram
Via playonlinux, install:
- 3d train studio - downloads free version via script. Pretty awesome for kids that like trains.
- 20 trains (running) is a fun one to download.
- gcompris - a big bundle of kids games, puzzles, and educational activities. Highly recommended.
- tuxpaint - awesome painting program with lots of stamps. The config allows various settings.
- tuxmath - still seeing if my kid likes it.
- tuxtype - my kid loves this typing tutor, from about 1yr old. Seriously.
- ktuberling - Mr Potato Head goes cyberspace.
- stopmotion - makes stopmotion - still testing this one
- playonlinux - scripts to install many Windows apps under wine. Most, but not all, require the CD
- extremetuxtracer - 3D racing game, with Tux sliding down a ski slope.
- neverputt - a minigolf game
- pingus - a funny game for kids that like penguins, and what kid doesn't?
- funnyboat - great kids game.
- pysiogame - another educational game suite like gcompris, slightly more advanced.
- stellarium - study the planets and stars.
- supertuxkart - 3D racing game in go-karts.
- sugar - the One Laptop Per Child OS. Still experimenting.
- connectagram - word de-scramble game.
Other stuff to remember:
* Celestia - no current install candidate.
2013-10-23
Hal 9000 will turn 16 soon, will he drive?
Something silly just occurred to me...
In "2001: A Space Odyssey", the ship was run by a computer called HAL 9000. HAL, they said, was "born" in 1997, January 12th to be precise. Yes, I'm one of those geeks that celebrates HAL's birthday. So, HAL's 16th birthday is coming up. Time to get a drivers license?
Yes, a fictitious computer in an old film that really has nothing to do with driving, except for the minor fact that autonomous cars are on the prowl. Those cars, or rather their computer drivers, are pretty much at the "time to get a driver's license" stage, coincidentally.
Yes, it's not really a drivers license but rather the long, slow process of changing laws to deal with silly things like cars that drive themselves. But, semantics aside, it really is time for HAL (or his cousins) to hit the road. Somehow, even considering HAL's villain status, I find that more comforting than the idea of the kid down the street getting his license. After all, I remember what I did on the road back when I was 16.
In "2001: A Space Odyssey", the ship was run by a computer called HAL 9000. HAL, they said, was "born" in 1997, January 12th to be precise. Yes, I'm one of those geeks that celebrates HAL's birthday. So, HAL's 16th birthday is coming up. Time to get a drivers license?
Yes, a fictitious computer in an old film that really has nothing to do with driving, except for the minor fact that autonomous cars are on the prowl. Those cars, or rather their computer drivers, are pretty much at the "time to get a driver's license" stage, coincidentally.
Yes, it's not really a drivers license but rather the long, slow process of changing laws to deal with silly things like cars that drive themselves. But, semantics aside, it really is time for HAL (or his cousins) to hit the road. Somehow, even considering HAL's villain status, I find that more comforting than the idea of the kid down the street getting his license. After all, I remember what I did on the road back when I was 16.
2012-12-17
Say NO to Privacy
Big Data is the new big thing. Data collection and mining and all that this entails. We have government ministries exploring data mining possibilities while other government ministries try to protect our privacy. The kids these days have no use for this formal kind of privacy and us older folk berate them for it. We show exactly how all this data they toss about can be used against them. But, you know, they’re right. In the end, their way will be the way it is. Our old private ways will be laughed at, and feared.
We are, of course, right too. Data will be mined and used against the people. There is great risk involved and very bad things can happen. However, there is also a solution. Information is power. If you have information about someone, you can use it against them. But, that’s only true if they don’t have information about you, particularly that you are using their information against them. While this sounds convoluted, it’s actually very simple. No privacy, none at all, and there’s no problem. This is where we’re heading. The problem is we’re not getting there fast enough.
We need privacy advocates because the information is uneven, because ‘they’ are collecting way more information about ‘us’ than we are about them. It’s not fair and the information imbalance can be used against the losing side. These privacy advocates can help, but they are not a real solution. For every obstacle put up to protect privacy there will be multiple paths around. For those of us on the losing side, there is a solution, a No Privacy Union.
How do we create a No Privacy Union? We take the same data mining techniques that government and big business are using and we put them up on a web service that we can all access. We have the advantage in numbers for this. We don’t need super-sophisticated data analysers and the like because we can crowdsource. But, we still need data to work with. So, we volunteer to input our data. Everything: all our financial transactions, where we work, where we go, what we do, everything. We scour the media, we input the leaks, we witness events and report what we see. These are inputs. Anyone can take any input and create a data stream; weighting truth, analysing, correlating, and aggregating; that produces an output. Any output can then be weighed and fed back into other streams. We can build data visualisations and patterns will emerge. Anyone can use the data. Yes, it can be used against us. But, we can use it against them too.
How can we use our data against those that hide their data from us? Simple. If they’re not in the No Privacy Union (NPU), we don’t do business with them. We don’t vote for them. We don’t include them in anything. It is a UNION. It is solidarity in numbers. When it’s only a few, the members mean nothing. When there are enough to sway an election, then politicians will take note. When a business bottom line is at stake, they will take note. There is no militancy required, no wars, no aggression. It is as peaceful a revolution as there could ever be. It is simply people sharing.
Imagine a politician that wants to get elected but there are a significant number of NPU voters. There are three choices: One, ignore them and pander to other groups. That works for a while, until the NPU gets too big. Two, villainize them, make them the bad people that other people should vote against. Not going to work too well when everything about these people is public knowledge. The third option will eventually be the only one left. Join them. When the NPU gets big enough then all politicians that want to get elected must join. Now, imagine trying to be a corrupt politician that freely posts all financial transactions. How will this politician be corrupt? When every decision is public, how will this politician make sleazy back-room deals that trade off one group against another? How will this politician use information about people as a weapon?
Imagine a business that wants to stay in business. To sell a product to NPU members, they must be part of the NPU, publishing everything about their company. All financial transactions, all the suppliers, everything. Yes, there are privacy regulations... employees must opt-in to having their payroll information included. Those that opt-out are anonymized; a black spot in the data. The black spots are okay because, like the Big Data being used against us, they will form patterns on their own. Like with the politicians, those sleazy deals and whatnot will become obvious. As data flows around the black spots, they will erode over time, especially when there are financial incentives involved.
The NPU will start out as tiny spots of light in a sea of black privacy. But, as it grows and grows, the light will spread until it is the black that is isolated into clumps. The more light there is, the harder it will be to hide in the dark. Those operating in the dark will be increasingly excluded from the light. This is citizen democracy and there is no stopping it. In the age of Big Data, there can be no privacy for citizens. The only real answer is for citizens to embrace this and demand the same for those that exercise power over us. It is time for us to exercise power over them.
In the future, our children’s future, privacy will be something socially granted. You won’t look at things that should be private because that’s the right thing to do. That, and the fact that you looked will be as much a public record as what you are looking at. Privacy only needs legal enforcement when there is a power imbalance. Where there is no privacy, there is no imbalance, and social limits will be all that are required. Our children can and will end privacy.
We are, of course, right too. Data will be mined and used against the people. There is great risk involved and very bad things can happen. However, there is also a solution. Information is power. If you have information about someone, you can use it against them. But, that’s only true if they don’t have information about you, particularly that you are using their information against them. While this sounds convoluted, it’s actually very simple. No privacy, none at all, and there’s no problem. This is where we’re heading. The problem is we’re not getting there fast enough.
We need privacy advocates because the information is uneven, because ‘they’ are collecting way more information about ‘us’ than we are about them. It’s not fair and the information imbalance can be used against the losing side. These privacy advocates can help, but they are not a real solution. For every obstacle put up to protect privacy there will be multiple paths around. For those of us on the losing side, there is a solution, a No Privacy Union.
How do we create a No Privacy Union? We take the same data mining techniques that government and big business are using and we put them up on a web service that we can all access. We have the advantage in numbers for this. We don’t need super-sophisticated data analysers and the like because we can crowdsource. But, we still need data to work with. So, we volunteer to input our data. Everything: all our financial transactions, where we work, where we go, what we do, everything. We scour the media, we input the leaks, we witness events and report what we see. These are inputs. Anyone can take any input and create a data stream; weighting truth, analysing, correlating, and aggregating; that produces an output. Any output can then be weighed and fed back into other streams. We can build data visualisations and patterns will emerge. Anyone can use the data. Yes, it can be used against us. But, we can use it against them too.
How can we use our data against those that hide their data from us? Simple. If they’re not in the No Privacy Union (NPU), we don’t do business with them. We don’t vote for them. We don’t include them in anything. It is a UNION. It is solidarity in numbers. When it’s only a few, the members mean nothing. When there are enough to sway an election, then politicians will take note. When a business bottom line is at stake, they will take note. There is no militancy required, no wars, no aggression. It is as peaceful a revolution as there could ever be. It is simply people sharing.
Imagine a politician that wants to get elected but there are a significant number of NPU voters. There are three choices: One, ignore them and pander to other groups. That works for a while, until the NPU gets too big. Two, villainize them, make them the bad people that other people should vote against. Not going to work too well when everything about these people is public knowledge. The third option will eventually be the only one left. Join them. When the NPU gets big enough then all politicians that want to get elected must join. Now, imagine trying to be a corrupt politician that freely posts all financial transactions. How will this politician be corrupt? When every decision is public, how will this politician make sleazy back-room deals that trade off one group against another? How will this politician use information about people as a weapon?
Imagine a business that wants to stay in business. To sell a product to NPU members, they must be part of the NPU, publishing everything about their company. All financial transactions, all the suppliers, everything. Yes, there are privacy regulations... employees must opt-in to having their payroll information included. Those that opt-out are anonymized; a black spot in the data. The black spots are okay because, like the Big Data being used against us, they will form patterns on their own. Like with the politicians, those sleazy deals and whatnot will become obvious. As data flows around the black spots, they will erode over time, especially when there are financial incentives involved.
The NPU will start out as tiny spots of light in a sea of black privacy. But, as it grows and grows, the light will spread until it is the black that is isolated into clumps. The more light there is, the harder it will be to hide in the dark. Those operating in the dark will be increasingly excluded from the light. This is citizen democracy and there is no stopping it. In the age of Big Data, there can be no privacy for citizens. The only real answer is for citizens to embrace this and demand the same for those that exercise power over us. It is time for us to exercise power over them.
In the future, our children’s future, privacy will be something socially granted. You won’t look at things that should be private because that’s the right thing to do. That, and the fact that you looked will be as much a public record as what you are looking at. Privacy only needs legal enforcement when there is a power imbalance. Where there is no privacy, there is no imbalance, and social limits will be all that are required. Our children can and will end privacy.
2012-01-31
CyberNav Mini Review
This is a review of the CyberNav Mini 5" Android-powered GPS tablet. Why am I writing this? Well, because I just bought one even though there were no reviews out on the web. Every page I found simply had the same sales brochure text on it, word for word. Very annoying. I decided to fix that for the next person. I'm going to break this review up into 3 parts. The first part will be my first-day impressions. Next, I'll write a 2-week synopsis. Finally, sometime when I've decided I've got all I'm going to get out of this thing, I'll write a wrap-up.
Caveats: First off, I'm no tablet expert. I use GPS quite a bit but for very specific purposes. I also have a Nokia N810 Internet Tablet, which I love. In fact, I love it so much I realized that if it ever broke, there would be a lot of things that I wouldn't be able to do. I realized that I needed a backup. There's nothing that will directly replace the N810 for me, but I thought this CyberNav Mini might replace some of the functions at least. Besides, it might make a decent cheap GPS to mount on my dual-purpose motorcycle and it will also allow me to explore the Android ecosystem, which I've been curious about. What this means is that I'm biased and my review is going to basically amount to a comparison with the N810. Take what you will from it. Nobody is paying me to do this, not even through the site adverts which, at the present rate, should net me my first $100 check in about 2018.
I'll not bother describing the published spec's as they're easy to find. Here are the points I first noticed:
That's it for now... stay tuned for part 2 mid February.
If you have any specific questions about it, leave a comment.
Update 1: just answering some comment questions
On my first trip to the woods, I fired up the CyberNav and it took it's sweet time getting a lock while I was walking around. Dense forest cover, stuff that would kill my older Garmins, but easily dealt with by the Dakota 20 I have (had - it died). So, good chip but the small antenna limits it a bit. It did lock; it did work. Overall, I'd say it's not bad. Once it gets a lock it seems quite good, very tenacious.
As for mapping apps:
The installed iGo with vector maps takes a bit of getting used to - drove my wife nuts while we were driving home as she couldn't figure out how to do anything. It does route, and auto-route again when you ignore it's directions. The speaker was loud enough to hear over a quiet stereo and the directions were understandable, unlike the N810 audio helper (my impression of the N810 voice was "kidnap victim in trunk of car with socks stuffed in mouth" - useless). No idea yet how the FM transmitter works, but I suppose that would negate listening to music... or maybe not... it's possible it's smart enough to do both but I'm not holding my breath on that. Android, at least v2.2, seems pretty anti-multitasking. I'll make a point of playing with the FM transmitter before the next review.
I've also been playing with the Orux mapping app. It's tile-based, a lot like the old Ozi Explorer that I used before the Garmin vector map editors got useful, before I started using Google Earth to view my tracks. In fact, I just converted my old Ozi maps into Orux format and uploaded them to the CyberNav. They seem to work quite well. So, now I have topo maps of Vancouver Island. Orux does have the ability to download and cache offline map tiles from a variety of sources, but they limit the download to 250MB per map. That's good for hiking in a park but not so great for off-roading. There is a utility call MOBAC (Mobile Atlas Creator, or something like that) which does allow as many tiles as you want per map, but the current version only supports Open Street Map (OSM). The previous version (1.8.x) supported a lot more sources, Google Maps etc., but they got shut down for license violation. You can still find the 1.8 version if you look for it. I'm using it now, as in right now, to cache from Microsoft Maps. Not sure if it will work yet. In any event, with the tile approach, there will always be a way to get decent maps - it's just a lot of work. Right now, I'm just bouncing around between things. It will take a while to find an effective work-flow for what I want to do. I know that, it's not really a CyberNav issue. Well, it would be nice if I could use the custom Garmin-format maps I've built. Haven't found a way to do that yet. Being a tablet rather than a dedicated GPS, it's entirely possible that this functionality will happen at some point. There are apps out there that do support Garmin vector maps.
One real CyberNav issue is that it is most definitely crashing, or something. It's not mechanical, no amount of twisting or tapping will make it shut down. It does seem to be something about the screen-lock or power-save mode. Very often, when I've left it on, with the USB charger connected or not, when I go to use it again by hitting the power button, the only way to get it out of it's blank-screen mode (the power button is the only button on this thing) it will reboot. It's never actually done this while I'm using it - so it's not an issue I'm fretting about. On vehicle-power while running a mapping app that keeps it awake, I don't see this reboot issue as causing any problems. I could be wrong though. I'll update when I know more.
(mini update: I turned off the screen blank and it ran on the USB charger for a couple of days straight. So, yeah, something to do with the power-save mode. It could be something as stupid as me not knowing the magic Android wakeup spell... it's only got that one button though)
(another mini update: Yeah, the "crashing" is just me being an Android newbee. First, returning from powersave mode involves hitting the power button and then WAITING for it. It takes a second or 2. If you don't wait and hold the power button down, it resets. Also, by design, Android shuts down after a defined period of time in powersave mode, 30 minutes by default with the CyberNav. Thus, it isn't crashing, it's just turning off. Nothing to see here, move along folks.)
Oh, battery life, so far, seems pretty consistent. 2 hours off the charger. That's about it. No idea how much standby time it gets as, as I've noted above, it's always off when I go to use it again. Unlike the N810, it doesn't take that long, or that much power, to boot back up though.
One more thing: the guy I bought it off of (if you can assume a masculine identity with "pumpkin_coolstore") says it's fine to link to his store. Thus, I'll assume the iGo maps are somewhat legit, or he doesn't care. I'm not saying this is the best place to buy but it worked well for me. The guy is very customs-savvy, if you know what I mean. Your results may vary.
Update 2: Sunlight and the Screen
I tried it today: Yay! Sun! ...for a few minutes anyway. Outside, the screen washed out completely in direct sunlight. In a side-by-side comparison between it and the N810, the N810 was clearly better. On the dash, the CyberNav was fine and the map always visible while driving around. On the dash, it also appeared brighter than the N810. Likely, the CyberNav has a stronger backlight but is missing that special something that makes the N810 screen better in direct sunlight. You do get what you pay for.
The screen washout might prove an issue with my plans to mount the CyberNav on my motorcycle. However, it shouldn't be that big a deal to shield it for a moment when necessary. Time will tell.
(mini update: Screen glare and washout in sunlight is significant and I nearly gave up trying to figure out how to deal with it. Even a sun-shade wasn't enough to make the map visible while riding. The final answer was, surprisingly, custom high-contrast maps. With those, the maps are visible while riding, even on a sunny day. The sun-shade makes them even better.)
Update 3: Two Weeks In
As a car GPS, unless you need the on-the-fly traffic updates that some dedicated units offer, I'd go with the CyberNav. The GPS is plenty good enough for car stuff, it comes with mounting hardware and power adaptors, and being an Android tablet the mapping options really are amazing. You have choice: see the OSM Mapping Apps list for a start, and that's just the ones that support Open Street Maps. I can't say I'm a fan of iGO, the app my CyberNav came with, but considering the options available I really don't care. I like options. Now, I've never owned or even used one of those dedicated car navigators so please take that into account when reading this review. I'm a back-country GPS user. On the road, well, I managed to circumnavigate North America on a road trip using a world map I got out of a cereal box, seriously. How good does a car GPS have to be?
I don't know how well the CyberNav will operate mounted on the handlebars of my Dual-sport bike, won't really know until spring. However, I've already identified a few mapping apps that look really good, Androzic being one of them as I'm an old OziExplorer users. I dumped my .ozf2 maps into the CyberNav and I'm already set to go, though I will remake these maps with my new routes edited into them. I'm hoping Maperitive will let me do that easily. For those that don't know, the Ozi .ozf2 format does zoom levels very, very well. While Orux supports Ozi maps, it doesn't support the .ozf2 image file format, which is too bad because it's great. Like I said, going with an Android tablet over a dedicated GPS offers a lot of choice, though choice does involve effort and compromise. If you don't like playing and just want directions to a hotel, the extra work might not be worth the effort.
As a walking GPS, I'd say the CyberNav is near useless and even the N810 is a significant improvement. With 2 hours of battery life and not being able to run the GPS while the screen is blanked, you're not going to get very far. If you wanted to mark your position in the parking lot, turn it off, and dump it in your pocket just in case, then it would be okay. It does fire up and find it's location fairly quickly and having that position might prove very, very useful. That's something my N810 fails at miserably as getting a fix can prove an exercise in patience. Then again, it's easy to swap batteries in the N810 and I carry a spare, something the CyberNav just can't do. I've needed that spare battery enough times to realize how much a problem not being able to swap would be. Power is the CyberNav's weakest point. Good in a car, okay to fire up for a quick fix, but if you want the CyberNav to keep the track of your hike, well, you better walk fast. It might be different if there was some secret power-save mode that doesn't reset the CyberNav just to wake up from. If I ever find that, I'll let you know.
Hardware-wise, the CyberNav is nothing to scream at, either way. The resistive screen works very well with a stylus but not so great with fingers. Funny thing was, it came with a shipping protector over the screen and I found fingers weren't that bad. Taking it off actually made finger-swipes harder. If I were a finger-swiping kind of guy, I think I'd be using screen protectors with it just to make the screen a little slipperier. On the other hand, being resistive, I'm hoping I can toss the thing in clear plastic on the bike to keep out the water. Can't do that with capacitive. I doubt fat-finger gloves will get me far so I'll likely have to rig up a stylus holder as well. I have no idea how well the hardware will hold up to the pounding and vibration on the bike. I've already killed 2 Garmin Etrex Legends that way. It's a pretty hostile environment; I don't ride slow and easy. The CyberNav has a much bigger screen and is a whole lot cheaper than the typical hiking GPS units I've used, so I'm willing to see how well it does. The only other hardware issue I've noticed is the CyberNav actually runs a little hot, even when off the USB charger, though it doesn't seem to be a problem. I don't think they worried too much about power management when they designed this thing.
I've done an at-home test with the FM transmitter and it does work. More surprising, Android allows the music player and the iGO app to run at the same time. Thus, it is possible that it will voice-over navigation directions while playing music from the device. I've not actually tried this yet. I'll update when I have. Please don't ask me to rate the audio quality... it's just not my thing. As far as I'm concerned, a car stereo is a device that drowns out the noise from things I haven't got around to fixing yet. A cheesy tablet transmitting FM over the power cable is fine by me.
(mini-update: Yes, it can play music and voice-over navigation from iGO while using the FM transmitter. It actually works quite well. I also found out this thing has a vibrator in it. It buzzes when the battery gets low. I can't think of any use for it, but it's there.)
This last part is more about Android 2.2 than the CyberNav itself. Then again, unless you're going to install something else, Android 2.2 is what you get. First off, I hate on-screen keyboards. The N810 blows the CyberNav out of the water for this very reason. Well, that and the other hardware keys. The lack of any real keys on the CyberNav makes a lot of things oddly difficult. No full-screen button, no zoom in/out, no screen lock. I never realized how useful those buttons were until I didn't have them. Then again, a decent operating system would make the lack of these buttons easier. Android 2.2 is not a decent operating system. Actually entering in text drove me nuts on the CyberNav until I figured out that I could add the Hackers Keyboard that actually had arrow keys. I mean, trying to put the cursor in the exact right position on a 5" screen with no recourse to moving it afterwards was very frustrating. Why anyone would ship a device OS without arrow keys stock? With the Hacker's Keyboard, life is a little easier, but I much prefer working with the N810 in this regard.
The CyberNav comes with a microSD card slot and I happened to have a spare. So, I threw it in. It didn't work, didn't recognize it at all, nothing. No format option either. So, I took it out and re-formatted it in my Linux desktop computer, formatted ext3 (Linux) because I'm that kind of guy. Nothing showed in the CyberNav, again. So, I reformatted it fat32 (DOS) and the CyberNav tried to mount it (mount being a Linux thing) and it just went straight to "safe to remove." That was helpful... I went around in circles for a while until I got the bright idea to format the SD card in an actual Windows machine. It worked fine in the CyberNav after that. So, while Android may have Linux roots, it's lost it's way. I mean, yes, Linux is down there somewhere, but it's buried under something that is not in the spirit of GNU/Linux.
I've used the N810 for several years and I've come to expect certain things from a mobile operating system, and Android doesn't have them. Android 2.2 is a little icky and I don't really like it. Power management is poor, the whole menu system is poor, notifications are poor, it's just clunky and everything -- as in the whole thing -- seems like an afterthought. I can sort of see why: it's designed to allow the screen to rotate, which makes either mode a compromise. It's designed to fit on much smaller screens than the 5" CyberNav, which is a compromise, and, well, it's all a compromise. I mean, on the N810 there's an app you can install that replaces the volume and backlight controls with a single tiny status icon, one that does screen rotation too. Tapping the wireless icon brings up all the wireless controls, like it should. The status bar in Android 2.2 has a bunch of icons that show status but do nothing when you tap them. Why do I have to dig down into the setup menu to find out the battery status? In Maemo, tapping the power status icon says "3 days standby, 7 hours use." You know, something useful. In Android, the volume controls take up half the bar, and then there's this big Media Refresh button, like that's something you need 20 times a day. It's just a big ugly waste of very precious space. I won't even get into multitasking and all the other things that an operating system should do, that Maemo does well and that Android just doesn't. I don't know, maybe the latest version of Android is a lot better. I hope so, because Maemo has been abandoned by Nokia and it's only chance for survival is a dedicated group of volunteer developers, and it blows Android 2.2 out of the water - there's no comparison.
Then, there's the Android Market. No doubt about it, there's an amazing selection of apps there. Finding them is an issue as the whole search function in the market seems designed to irritate the hell out of a person. I mean, who would design a search pane that shows previous searches but doesn't let you edit them before redoing them? What's the point? I search for "mapping" and get way too many hits. So, I hit the search button again and the search box is clear. Below it is a list of previous searches. At that point, you can type your search in again, "mapping vector" for example, or you can hit "mapping" below, and redo your search on mapping. Remember, this is all on a horrible virtual keyboard, no cnrl-c/v. The very notion of having a search box that lets you re-run previous searches without the ability to edit them pretty much sums up Android. It's just not finished, anywhere.
The N810 has a standard set of debian Linux package repositories. If you know Linux, these make perfect sense. They work via GUI or via terminal, like all things Linux. Maemo is Linux, not some obfuscated kernel buried under a half-baked GUI menu. These package repositories have a useful number of applications, mostly ones that have been ported from the standard Linux repositories. However, the choices are very limited in comparison to the Android market. Yes, near any Linux application could be ported to the N810, but it would have to be "hildonized," to work properly. Hildon being the actual desktop interface used by Maemo. This is possible to do but requires quite a skill-set. The result is that the applications that developer-type people want are all in the Maemo repositories, but other things can be scarce. So, yes, there's a certain amount of app-envy going on, even if Maemo is better overall. If I could get an Android emulator for Maemo, I'd re-install the CyberNav straight away; no second thoughts. In part, I bought the CyberNav to see what Android was all about. I've seen... not impressed, but still want the apps so I'll use Android and deal with the lousy market to get them.
Another mini-update: Speaking of apps... the music player that the CyberNav comes with is absurdly frustrating, almost bizarrely frustrating. In the Android Market there are a lot of replacements. I picked "the Android Music Player" from JRTStudio. No idea if that's the best but it sure beats the stock one. Supposedly, it's a back-port of the OpenSource one that came with Honeycome.
The biggest problem is the screen. At first, it was impossible to see in daylight. Nothing, nadda, just washed out glare. I tried not using any screen protector, I tried a sun screen, and I tried a lot of swearing. I almost gave up on the thing and relegated it to kid-toy status. But, in all my trials, I did notice one odd thing. While I couldn't see anything on the map, I could see the white application border. Ah, I thought, maybe high-contrast maps would help a little. Actually, they helped significantly, much more than expected, and more than enough to make the CyberNav useful in daylight. My kid's not happy that he lost his new toy but I have something I can play with.
Yes, with custom high-contrast mostly black and white maps with nice thick lines for roads and very little other details, the CyberNav screen is readable while mounted on the handlebars. At a glance, I can see the trail I'm on, I can see when the intersections are coming up, and, well, it's great. More than great, really, with that 5" screen it's the best I've ever had for riding.
I'm running it off a dollar-store cig-lighter to USB charger, basically the same as what the CyberNav came with. The intent, someday, is to wire the adapter right into the bike wiring harness, thus I didn't want to cut up the original, but I've not actually got there yet. It's just sitting there taped in place. Works fine.
I've got around 1000km of fairly aggressive trail riding on it and it seems to be holding up well. I fabricated a mount for it using rubber grommets to isolate vibration but I'm not entirely happy with the results - still too much buzzing. So far, the CyberNav has handled that without complaint but I expect there are internal connections that will have issues at some point. I may fab a better mount... maybe for the next tablet.
The screen seems to be holding up well even when being coated with dust then jabbed at and swiped by gloved hands while riding. I figured it would be a mess of scratches by now, what with no screen protector, but it still looks pretty good. I was concerned about using a resistive display rather than the tougher capacitive ones. But, the resistive display means that I don't have to futz around with trying to make conductive fingers on my gloves and it seems to be holding up well enough. My next tablet might just be resistive too.
I've been lucky so far in not having major rain events while riding. For the drizzle and soaked branches I've run into, the sun screen has provided more than adequate coverage. I figure, if it really, really starts to pour... the CyberNav can go in my pocket and I'll head home. I know where home is... don't need a navigator for that one. It's been splashed with mud while crashing through the bush behind other riders in a dualsport event. It's been pounded through the rough sections to the point where I was bottoming my suspension so hard I had to back off. It's lived the life of a dirtbiker, and it's been tough like one too. I am impressed.
The CyberNav can have issues while trying to get a location fix while under heavy tree cover and moving quickly. Being under heavy tree cover and moving quickly is a dirtbiker's natural habitat so that has caused a few missed sections on recorded tracks. Once it has a lock, it generally keeps it. But, there have been a few times where I had to stop in a clearing to let it find it's way. It's better than my old Garmin Etrek Legend was, but not as good as my Dakota 20. It's also cheaper than both by far so I can live with it's current performance.
It has crashed on me while riding a few times. (I've crashed on it a couple of times, so all's fair ) I don't know if it's the hardware, the OS, or the mapping application. I'm running Orux Maps and it's still rather fresh, so I'm not going to scream about stability problems. I've settled on Orux Maps after a lot of searching. Orux is very, very customizable. It is so customizable that, out of the box, it really doesn't come across that good. But, if you dig down and experiment, you can set it up to do amazing things. Stuff like hiding all the controls to give you a full screen of map, with the controls just a tap away. Nice big buttons if you want, or small. Everything seems to be adjustable... I'm even running my very own custom cursor. Orux rocks when you set it up right.
Orux is using a custom set of map tiles I've created from OSM data. That was a huge ordeal to get figured out. Editing OSM data via JOSM, to Maperitive with a custom rule-set to create the tiles, to MOBAC to make the Orux maps. Each program has a significant learning curve and everything has to be right to get what I wanted. However, that is now history. I've got it figured and I can make any kind of map I want with anything on it. I now have the maps I dreamed of while fighting in the Garmin world. All my data, all my regular routes, all the areas I've found on Google Earth and have marked for exploration. They're all there on the CyberNav screen as I crash through overgrown trails others have long forgotten about. That's the whole point of riding with a GPS mounted on the handlebars.
I am completely sold on using an Android tablet as a handlebar mounted GPS. There are issues with cheap hardware, the screen is not what I would prefer, but with the right maps it's more than good enough. It's better than anything I've run before. It's also very cheap. At this point, I don't really care if I kill the CyberNav in a year or so of riding. I'm so happy with the approach that I've already decided I'll be buying a new Android tablet every winter for the next few years. The old ones will get relegated to backup status, and eventually be that toy for my kid. The tablets are improving so fast that a yearly replacement seems the way to go. Rather than paying for the latest and greatest, just keep buying the current cheap model (last year's latest and greatest). If they die on the bike... oh well. If they live, like the CyberNav has, then I'll be even happier than I am now.
Update: Pictures!


Caveats: First off, I'm no tablet expert. I use GPS quite a bit but for very specific purposes. I also have a Nokia N810 Internet Tablet, which I love. In fact, I love it so much I realized that if it ever broke, there would be a lot of things that I wouldn't be able to do. I realized that I needed a backup. There's nothing that will directly replace the N810 for me, but I thought this CyberNav Mini might replace some of the functions at least. Besides, it might make a decent cheap GPS to mount on my dual-purpose motorcycle and it will also allow me to explore the Android ecosystem, which I've been curious about. What this means is that I'm biased and my review is going to basically amount to a comparison with the N810. Take what you will from it. Nobody is paying me to do this, not even through the site adverts which, at the present rate, should net me my first $100 check in about 2018.
I'll not bother describing the published spec's as they're easy to find. Here are the points I first noticed:
- It does have a tilt sensor. Actually, the level app I installed needed it switched to 'accelerometer' rather than tilt sensor. The level app seems to work okay, so I'm guessing the resolution isn't that bad. Nothing to compare it to, though, other than real levels. I certainly won't be using it to replace my precision machinist's level. It would be more than enough to hang a shelf with.
- The little cap on the top-right (opposite the power button) that looks like a stylus cap is not a stylus. The first thing I did was rip that off in the hopes that it was... had to glue it back on. Oh well.
- The resistive touch screen really works better with a stylus. The GPS mount comes with a tiny one... I've been using my spare N810. Overall, it seems quite precise. It is not multi-touch.
- The GPS is pretty good. I had to go outside for its very first fix, and that took a few minutes. But, overall, it seems to be reasonably sensitive. Not quite as good as my Garmin Dakota 20, but a lot better than the N810.
- I bought mine from an E-Bay reseller and it came with iGo maps. No idea if that's legit or not, so I'm not going to say exactly who I bought it from, but I appreciate the maps. The iGo app is pretty much a "get me to where I want to go" city navigator. Not much use for the likes of me that want to build custom maps, record tracks, and similar activities. OruxMaps, on the other hand, looks promising.
- Battery life, so far, seems to be about the published 2 hours of playing. With the N810, I can get 3 days standby, 6 hours of play, or about 3 hours of GPS. With the CyberNav, running the GPS doesn't seem to make that big a difference. However, this is still very tentative. I'll know better in a couple of weeks.
- Android, at least version 2.2, is not much to scream about compared to the N810's Maemo (debian Linux) OS. I've still not really got into it that far, but it seems to obfuscate rather than just give me control. Then again, I don't really know how to do anything in Android yet, so this too will have to wait for later reviews.
- The Android Market is both amazing and frustrating. Amazing, because it has many more apps than what is available for the N810. Frustrating, because most of them want internet access so they can deliver advertising. However, eventually I got smart and searched for 'opensource'. That gave about 20 pages of goodness.
That's it for now... stay tuned for part 2 mid February.
If you have any specific questions about it, leave a comment.
Update 1: just answering some comment questions
On my first trip to the woods, I fired up the CyberNav and it took it's sweet time getting a lock while I was walking around. Dense forest cover, stuff that would kill my older Garmins, but easily dealt with by the Dakota 20 I have (had - it died). So, good chip but the small antenna limits it a bit. It did lock; it did work. Overall, I'd say it's not bad. Once it gets a lock it seems quite good, very tenacious.
As for mapping apps:
The installed iGo with vector maps takes a bit of getting used to - drove my wife nuts while we were driving home as she couldn't figure out how to do anything. It does route, and auto-route again when you ignore it's directions. The speaker was loud enough to hear over a quiet stereo and the directions were understandable, unlike the N810 audio helper (my impression of the N810 voice was "kidnap victim in trunk of car with socks stuffed in mouth" - useless). No idea yet how the FM transmitter works, but I suppose that would negate listening to music... or maybe not... it's possible it's smart enough to do both but I'm not holding my breath on that. Android, at least v2.2, seems pretty anti-multitasking. I'll make a point of playing with the FM transmitter before the next review.
I've also been playing with the Orux mapping app. It's tile-based, a lot like the old Ozi Explorer that I used before the Garmin vector map editors got useful, before I started using Google Earth to view my tracks. In fact, I just converted my old Ozi maps into Orux format and uploaded them to the CyberNav. They seem to work quite well. So, now I have topo maps of Vancouver Island. Orux does have the ability to download and cache offline map tiles from a variety of sources, but they limit the download to 250MB per map. That's good for hiking in a park but not so great for off-roading. There is a utility call MOBAC (Mobile Atlas Creator, or something like that) which does allow as many tiles as you want per map, but the current version only supports Open Street Map (OSM). The previous version (1.8.x) supported a lot more sources, Google Maps etc., but they got shut down for license violation. You can still find the 1.8 version if you look for it. I'm using it now, as in right now, to cache from Microsoft Maps. Not sure if it will work yet. In any event, with the tile approach, there will always be a way to get decent maps - it's just a lot of work. Right now, I'm just bouncing around between things. It will take a while to find an effective work-flow for what I want to do. I know that, it's not really a CyberNav issue. Well, it would be nice if I could use the custom Garmin-format maps I've built. Haven't found a way to do that yet. Being a tablet rather than a dedicated GPS, it's entirely possible that this functionality will happen at some point. There are apps out there that do support Garmin vector maps.
One real CyberNav issue is that it is most definitely crashing, or something. It's not mechanical, no amount of twisting or tapping will make it shut down. It does seem to be something about the screen-lock or power-save mode. Very often, when I've left it on, with the USB charger connected or not, when I go to use it again by hitting the power button, the only way to get it out of it's blank-screen mode (the power button is the only button on this thing) it will reboot. It's never actually done this while I'm using it - so it's not an issue I'm fretting about. On vehicle-power while running a mapping app that keeps it awake, I don't see this reboot issue as causing any problems. I could be wrong though. I'll update when I know more.
(mini update: I turned off the screen blank and it ran on the USB charger for a couple of days straight. So, yeah, something to do with the power-save mode. It could be something as stupid as me not knowing the magic Android wakeup spell... it's only got that one button though)
(another mini update: Yeah, the "crashing" is just me being an Android newbee. First, returning from powersave mode involves hitting the power button and then WAITING for it. It takes a second or 2. If you don't wait and hold the power button down, it resets. Also, by design, Android shuts down after a defined period of time in powersave mode, 30 minutes by default with the CyberNav. Thus, it isn't crashing, it's just turning off. Nothing to see here, move along folks.)
Oh, battery life, so far, seems pretty consistent. 2 hours off the charger. That's about it. No idea how much standby time it gets as, as I've noted above, it's always off when I go to use it again. Unlike the N810, it doesn't take that long, or that much power, to boot back up though.
One more thing: the guy I bought it off of (if you can assume a masculine identity with "pumpkin_coolstore") says it's fine to link to his store. Thus, I'll assume the iGo maps are somewhat legit, or he doesn't care. I'm not saying this is the best place to buy but it worked well for me. The guy is very customs-savvy, if you know what I mean. Your results may vary.
Update 2: Sunlight and the Screen
I tried it today: Yay! Sun! ...for a few minutes anyway. Outside, the screen washed out completely in direct sunlight. In a side-by-side comparison between it and the N810, the N810 was clearly better. On the dash, the CyberNav was fine and the map always visible while driving around. On the dash, it also appeared brighter than the N810. Likely, the CyberNav has a stronger backlight but is missing that special something that makes the N810 screen better in direct sunlight. You do get what you pay for.
The screen washout might prove an issue with my plans to mount the CyberNav on my motorcycle. However, it shouldn't be that big a deal to shield it for a moment when necessary. Time will tell.
(mini update: Screen glare and washout in sunlight is significant and I nearly gave up trying to figure out how to deal with it. Even a sun-shade wasn't enough to make the map visible while riding. The final answer was, surprisingly, custom high-contrast maps. With those, the maps are visible while riding, even on a sunny day. The sun-shade makes them even better.)
Update 3: Two Weeks In
As a car GPS, unless you need the on-the-fly traffic updates that some dedicated units offer, I'd go with the CyberNav. The GPS is plenty good enough for car stuff, it comes with mounting hardware and power adaptors, and being an Android tablet the mapping options really are amazing. You have choice: see the OSM Mapping Apps list for a start, and that's just the ones that support Open Street Maps. I can't say I'm a fan of iGO, the app my CyberNav came with, but considering the options available I really don't care. I like options. Now, I've never owned or even used one of those dedicated car navigators so please take that into account when reading this review. I'm a back-country GPS user. On the road, well, I managed to circumnavigate North America on a road trip using a world map I got out of a cereal box, seriously. How good does a car GPS have to be?
I don't know how well the CyberNav will operate mounted on the handlebars of my Dual-sport bike, won't really know until spring. However, I've already identified a few mapping apps that look really good, Androzic being one of them as I'm an old OziExplorer users. I dumped my .ozf2 maps into the CyberNav and I'm already set to go, though I will remake these maps with my new routes edited into them. I'm hoping Maperitive will let me do that easily. For those that don't know, the Ozi .ozf2 format does zoom levels very, very well. While Orux supports Ozi maps, it doesn't support the .ozf2 image file format, which is too bad because it's great. Like I said, going with an Android tablet over a dedicated GPS offers a lot of choice, though choice does involve effort and compromise. If you don't like playing and just want directions to a hotel, the extra work might not be worth the effort.
As a walking GPS, I'd say the CyberNav is near useless and even the N810 is a significant improvement. With 2 hours of battery life and not being able to run the GPS while the screen is blanked, you're not going to get very far. If you wanted to mark your position in the parking lot, turn it off, and dump it in your pocket just in case, then it would be okay. It does fire up and find it's location fairly quickly and having that position might prove very, very useful. That's something my N810 fails at miserably as getting a fix can prove an exercise in patience. Then again, it's easy to swap batteries in the N810 and I carry a spare, something the CyberNav just can't do. I've needed that spare battery enough times to realize how much a problem not being able to swap would be. Power is the CyberNav's weakest point. Good in a car, okay to fire up for a quick fix, but if you want the CyberNav to keep the track of your hike, well, you better walk fast. It might be different if there was some secret power-save mode that doesn't reset the CyberNav just to wake up from. If I ever find that, I'll let you know.
Hardware-wise, the CyberNav is nothing to scream at, either way. The resistive screen works very well with a stylus but not so great with fingers. Funny thing was, it came with a shipping protector over the screen and I found fingers weren't that bad. Taking it off actually made finger-swipes harder. If I were a finger-swiping kind of guy, I think I'd be using screen protectors with it just to make the screen a little slipperier. On the other hand, being resistive, I'm hoping I can toss the thing in clear plastic on the bike to keep out the water. Can't do that with capacitive. I doubt fat-finger gloves will get me far so I'll likely have to rig up a stylus holder as well. I have no idea how well the hardware will hold up to the pounding and vibration on the bike. I've already killed 2 Garmin Etrex Legends that way. It's a pretty hostile environment; I don't ride slow and easy. The CyberNav has a much bigger screen and is a whole lot cheaper than the typical hiking GPS units I've used, so I'm willing to see how well it does. The only other hardware issue I've noticed is the CyberNav actually runs a little hot, even when off the USB charger, though it doesn't seem to be a problem. I don't think they worried too much about power management when they designed this thing.
I've done an at-home test with the FM transmitter and it does work. More surprising, Android allows the music player and the iGO app to run at the same time. Thus, it is possible that it will voice-over navigation directions while playing music from the device. I've not actually tried this yet. I'll update when I have. Please don't ask me to rate the audio quality... it's just not my thing. As far as I'm concerned, a car stereo is a device that drowns out the noise from things I haven't got around to fixing yet. A cheesy tablet transmitting FM over the power cable is fine by me.
(mini-update: Yes, it can play music and voice-over navigation from iGO while using the FM transmitter. It actually works quite well. I also found out this thing has a vibrator in it. It buzzes when the battery gets low. I can't think of any use for it, but it's there.)
This last part is more about Android 2.2 than the CyberNav itself. Then again, unless you're going to install something else, Android 2.2 is what you get. First off, I hate on-screen keyboards. The N810 blows the CyberNav out of the water for this very reason. Well, that and the other hardware keys. The lack of any real keys on the CyberNav makes a lot of things oddly difficult. No full-screen button, no zoom in/out, no screen lock. I never realized how useful those buttons were until I didn't have them. Then again, a decent operating system would make the lack of these buttons easier. Android 2.2 is not a decent operating system. Actually entering in text drove me nuts on the CyberNav until I figured out that I could add the Hackers Keyboard that actually had arrow keys. I mean, trying to put the cursor in the exact right position on a 5" screen with no recourse to moving it afterwards was very frustrating. Why anyone would ship a device OS without arrow keys stock? With the Hacker's Keyboard, life is a little easier, but I much prefer working with the N810 in this regard.
The CyberNav comes with a microSD card slot and I happened to have a spare. So, I threw it in. It didn't work, didn't recognize it at all, nothing. No format option either. So, I took it out and re-formatted it in my Linux desktop computer, formatted ext3 (Linux) because I'm that kind of guy. Nothing showed in the CyberNav, again. So, I reformatted it fat32 (DOS) and the CyberNav tried to mount it (mount being a Linux thing) and it just went straight to "safe to remove." That was helpful... I went around in circles for a while until I got the bright idea to format the SD card in an actual Windows machine. It worked fine in the CyberNav after that. So, while Android may have Linux roots, it's lost it's way. I mean, yes, Linux is down there somewhere, but it's buried under something that is not in the spirit of GNU/Linux.
I've used the N810 for several years and I've come to expect certain things from a mobile operating system, and Android doesn't have them. Android 2.2 is a little icky and I don't really like it. Power management is poor, the whole menu system is poor, notifications are poor, it's just clunky and everything -- as in the whole thing -- seems like an afterthought. I can sort of see why: it's designed to allow the screen to rotate, which makes either mode a compromise. It's designed to fit on much smaller screens than the 5" CyberNav, which is a compromise, and, well, it's all a compromise. I mean, on the N810 there's an app you can install that replaces the volume and backlight controls with a single tiny status icon, one that does screen rotation too. Tapping the wireless icon brings up all the wireless controls, like it should. The status bar in Android 2.2 has a bunch of icons that show status but do nothing when you tap them. Why do I have to dig down into the setup menu to find out the battery status? In Maemo, tapping the power status icon says "3 days standby, 7 hours use." You know, something useful. In Android, the volume controls take up half the bar, and then there's this big Media Refresh button, like that's something you need 20 times a day. It's just a big ugly waste of very precious space. I won't even get into multitasking and all the other things that an operating system should do, that Maemo does well and that Android just doesn't. I don't know, maybe the latest version of Android is a lot better. I hope so, because Maemo has been abandoned by Nokia and it's only chance for survival is a dedicated group of volunteer developers, and it blows Android 2.2 out of the water - there's no comparison.
Then, there's the Android Market. No doubt about it, there's an amazing selection of apps there. Finding them is an issue as the whole search function in the market seems designed to irritate the hell out of a person. I mean, who would design a search pane that shows previous searches but doesn't let you edit them before redoing them? What's the point? I search for "mapping" and get way too many hits. So, I hit the search button again and the search box is clear. Below it is a list of previous searches. At that point, you can type your search in again, "mapping vector" for example, or you can hit "mapping" below, and redo your search on mapping. Remember, this is all on a horrible virtual keyboard, no cnrl-c/v. The very notion of having a search box that lets you re-run previous searches without the ability to edit them pretty much sums up Android. It's just not finished, anywhere.
The N810 has a standard set of debian Linux package repositories. If you know Linux, these make perfect sense. They work via GUI or via terminal, like all things Linux. Maemo is Linux, not some obfuscated kernel buried under a half-baked GUI menu. These package repositories have a useful number of applications, mostly ones that have been ported from the standard Linux repositories. However, the choices are very limited in comparison to the Android market. Yes, near any Linux application could be ported to the N810, but it would have to be "hildonized," to work properly. Hildon being the actual desktop interface used by Maemo. This is possible to do but requires quite a skill-set. The result is that the applications that developer-type people want are all in the Maemo repositories, but other things can be scarce. So, yes, there's a certain amount of app-envy going on, even if Maemo is better overall. If I could get an Android emulator for Maemo, I'd re-install the CyberNav straight away; no second thoughts. In part, I bought the CyberNav to see what Android was all about. I've seen... not impressed, but still want the apps so I'll use Android and deal with the lousy market to get them.
Another mini-update: Speaking of apps... the music player that the CyberNav comes with is absurdly frustrating, almost bizarrely frustrating. In the Android Market there are a lot of replacements. I picked "the Android Music Player" from JRTStudio. No idea if that's the best but it sure beats the stock one. Supposedly, it's a back-port of the OpenSource one that came with Honeycome.
Update 4: The Wrap-Up
I quite like having the CyberNav mounted on the handlebars of my dualsport motorcycle. It was not without issues in the beginning, but it's great now that I've worked out the kinks.The biggest problem is the screen. At first, it was impossible to see in daylight. Nothing, nadda, just washed out glare. I tried not using any screen protector, I tried a sun screen, and I tried a lot of swearing. I almost gave up on the thing and relegated it to kid-toy status. But, in all my trials, I did notice one odd thing. While I couldn't see anything on the map, I could see the white application border. Ah, I thought, maybe high-contrast maps would help a little. Actually, they helped significantly, much more than expected, and more than enough to make the CyberNav useful in daylight. My kid's not happy that he lost his new toy but I have something I can play with.
Yes, with custom high-contrast mostly black and white maps with nice thick lines for roads and very little other details, the CyberNav screen is readable while mounted on the handlebars. At a glance, I can see the trail I'm on, I can see when the intersections are coming up, and, well, it's great. More than great, really, with that 5" screen it's the best I've ever had for riding.
I'm running it off a dollar-store cig-lighter to USB charger, basically the same as what the CyberNav came with. The intent, someday, is to wire the adapter right into the bike wiring harness, thus I didn't want to cut up the original, but I've not actually got there yet. It's just sitting there taped in place. Works fine.
I've got around 1000km of fairly aggressive trail riding on it and it seems to be holding up well. I fabricated a mount for it using rubber grommets to isolate vibration but I'm not entirely happy with the results - still too much buzzing. So far, the CyberNav has handled that without complaint but I expect there are internal connections that will have issues at some point. I may fab a better mount... maybe for the next tablet.
The screen seems to be holding up well even when being coated with dust then jabbed at and swiped by gloved hands while riding. I figured it would be a mess of scratches by now, what with no screen protector, but it still looks pretty good. I was concerned about using a resistive display rather than the tougher capacitive ones. But, the resistive display means that I don't have to futz around with trying to make conductive fingers on my gloves and it seems to be holding up well enough. My next tablet might just be resistive too.
I've been lucky so far in not having major rain events while riding. For the drizzle and soaked branches I've run into, the sun screen has provided more than adequate coverage. I figure, if it really, really starts to pour... the CyberNav can go in my pocket and I'll head home. I know where home is... don't need a navigator for that one. It's been splashed with mud while crashing through the bush behind other riders in a dualsport event. It's been pounded through the rough sections to the point where I was bottoming my suspension so hard I had to back off. It's lived the life of a dirtbiker, and it's been tough like one too. I am impressed.
The CyberNav can have issues while trying to get a location fix while under heavy tree cover and moving quickly. Being under heavy tree cover and moving quickly is a dirtbiker's natural habitat so that has caused a few missed sections on recorded tracks. Once it has a lock, it generally keeps it. But, there have been a few times where I had to stop in a clearing to let it find it's way. It's better than my old Garmin Etrek Legend was, but not as good as my Dakota 20. It's also cheaper than both by far so I can live with it's current performance.
It has crashed on me while riding a few times. (I've crashed on it a couple of times, so all's fair ) I don't know if it's the hardware, the OS, or the mapping application. I'm running Orux Maps and it's still rather fresh, so I'm not going to scream about stability problems. I've settled on Orux Maps after a lot of searching. Orux is very, very customizable. It is so customizable that, out of the box, it really doesn't come across that good. But, if you dig down and experiment, you can set it up to do amazing things. Stuff like hiding all the controls to give you a full screen of map, with the controls just a tap away. Nice big buttons if you want, or small. Everything seems to be adjustable... I'm even running my very own custom cursor. Orux rocks when you set it up right.
Orux is using a custom set of map tiles I've created from OSM data. That was a huge ordeal to get figured out. Editing OSM data via JOSM, to Maperitive with a custom rule-set to create the tiles, to MOBAC to make the Orux maps. Each program has a significant learning curve and everything has to be right to get what I wanted. However, that is now history. I've got it figured and I can make any kind of map I want with anything on it. I now have the maps I dreamed of while fighting in the Garmin world. All my data, all my regular routes, all the areas I've found on Google Earth and have marked for exploration. They're all there on the CyberNav screen as I crash through overgrown trails others have long forgotten about. That's the whole point of riding with a GPS mounted on the handlebars.
I am completely sold on using an Android tablet as a handlebar mounted GPS. There are issues with cheap hardware, the screen is not what I would prefer, but with the right maps it's more than good enough. It's better than anything I've run before. It's also very cheap. At this point, I don't really care if I kill the CyberNav in a year or so of riding. I'm so happy with the approach that I've already decided I'll be buying a new Android tablet every winter for the next few years. The old ones will get relegated to backup status, and eventually be that toy for my kid. The tablets are improving so fast that a yearly replacement seems the way to go. Rather than paying for the latest and greatest, just keep buying the current cheap model (last year's latest and greatest). If they die on the bike... oh well. If they live, like the CyberNav has, then I'll be even happier than I am now.
Update: Pictures!
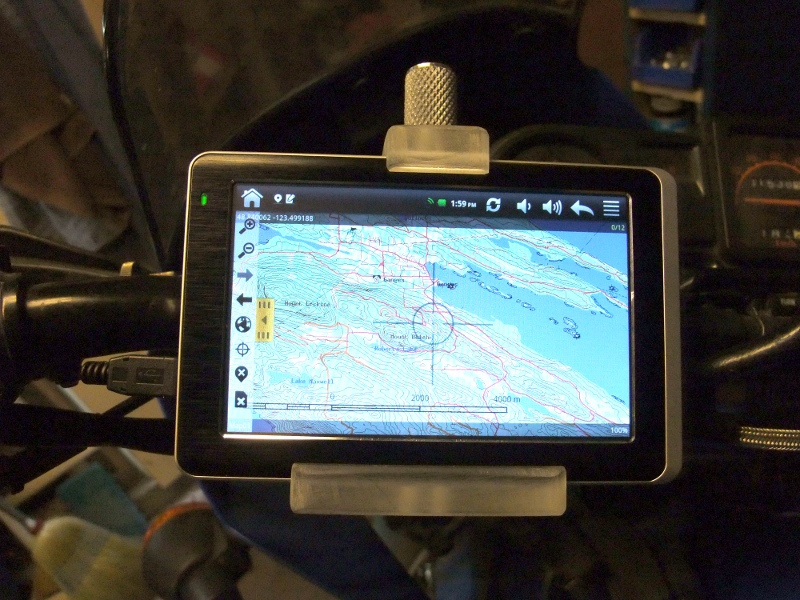
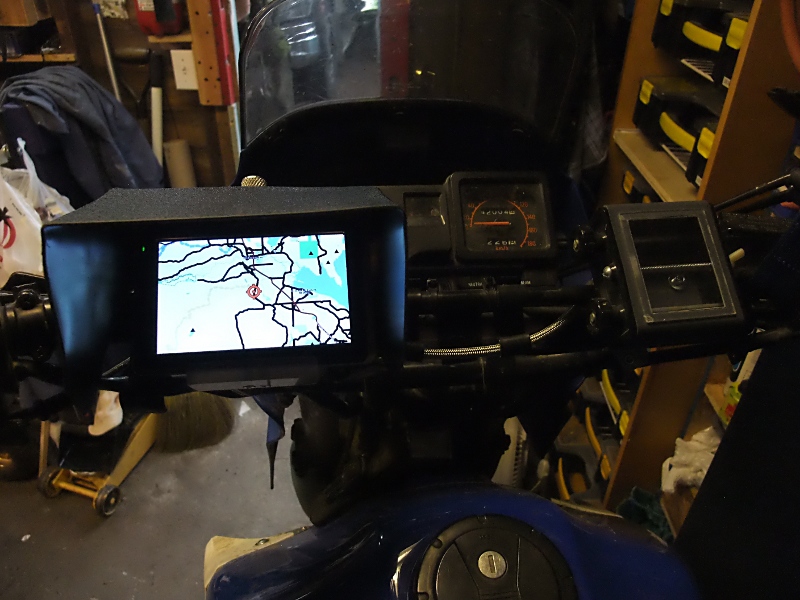
Another mini update: Nearly 2015 and the stupid thing is still working. No screen protector, no waterproof cover, mounted on the handlebar of a dirtbike being ridden by a crazy person, sometimes in sanctioned off-road races, in the pouring rain. 3 years of riding... It still works.
And another update... this thing rocks! So, the battery basically died. It would last maybe 5 min on a charge. Normally, I'm running it on my fully off-road dirtbike, powered with a $15 USB battery pack... spec'd at 30,000mah (yeah, right) but it runs the CyberNav for over 5 hours, which is longer than I can last crashing around in the bush. But, every once in a while, the battery pack shuts off, or the connector gets bumped, etc.. It's annoying as the CyberNav then shuts down. I like recording my tracks for later mapping and missing big chunks is annoying. So, I decided to replace the battery. I cracked it open, measured the existing battery, which was quite small, and the space that a battery could fit. Ebay price for a replacement was $20... hmmm... I've actually bought 3 of those 30,000mah battery packs, less than $20 each, and I know they have 4 batteries in them (because I'm the kind of guy that takes things apart for fun): 2 big, 2 small, all in parallel. The big one is exactly the max size that will fit in the CyberNav. Well, you can guess the rest. The CyberNav now runs for well over an hour again. Still works. Screen has a few scratches but nothing serious. Still mounted on the handlebars of my dirtbike... rain, dust, mud, lots of vibration, crashes... stupid thing must have been made by Timex.
2011-05-30
Google SketchUp Notes
Scope
This file is the result of my personal note-taking while learning SketchUp. I am not an expert in SketchUp, nor is this a complete SketchUp tutorial, nor is it intended to be for everyone. It may, however, be useful for people like me that don’t have patience to watch video tutorials and prefer to just dive into an application, figuring things out as they go. Also, this is focused on drawing parts that will then be printed out as working drawings for construction. SketchUp has many other facets not covered as they don’t particularly interest me. This is a compilation of my notes, taken from various sources, many as direct cut/paste operations. While I’ve made no attempt at individually citing each point (I hadn’t really intended to share this when I started), I have placed my sources at the end. Note that this document may be updated as I learn more.Philosophy
- You can use the keyboard to enter very precise distances. When you create a line, box, circle, etc., or are scaling, rotating, extruding, moving, etc., after the initial click you can type in any value, or values separated by a comma in the case of a box, via the keyboard. If you don’t like that value, you can type another in, and again, over and over, until you like it. Once you move to the next entity, you can still change things via the scale, move, or rotate tools, or sometimes the component info window. Also, when typing in, it will assume the units defined by the model, but you can add whatever units you like just by typing them in (eg: 12mm even if the model is set to use meters). You can view these numbers via the measurements toolbar.
- Tools or other controls can operate differently depending if things are preselected. The follow-me tool is a prime example. There are some tools that work slightly differently from the pull down menus rather than the context (right-click) menu (like making components).
- Context is important. If you are editing a group or component, making it “the context,” then scaling, for example, will be on that group, not the whole model. Components can contain components or groups, or vice-versa. There does not appear to be a fixed limit on how far this nesting can go, but it can be computer intensive.
- The status bar at the bottom often has useful information or hints about what to do next when using a tool. The colours of various guides and the cursor dots have meaning as you draw.
- There are many Ruby plugins for SketchUp that do a lot of very useful things. SketchUp is not really complete without them.
Getting Started
- In Window - Model Info, you can set many model defaults, like the units.
- Draw a box in 2D, extrude a face into 3D. Draw a line on a face to divide it and then extrude one of the faces away. You are now editing a model in 3D.
- Select a line and move it, notice how it distorts everything connected to it.
- Undo - it’s very useful.
- Select everything and make them a single component or group object.
- Add a line connected to the above object.
- Move the line, noting how the object does not distort.
- Select the line and cut it.
- Double-click the object with the select tool to edit it.
- Paste in Place to put the line in the object.
- Click outside the object edit frame to close editing on the object
- The line is now part of the object group/component.
- Open the Scene window and create a scene.
- Orbit/Pan/Zoom around until the object looks like what you want.
- Update the scene (right-click on the scene tab).
- Print Preview, without setting extents to model.
Mouse Shortcuts
- No matter the tool, the middle mouse button will orbit, shift middle will pan.
- Double-clicking the middle mouse button on an entity will make it center on the screen, though not so easy to avoid zooming with a wheel/button while doing this.
- Double-left-click on a face with the select tool will select the face and the lines that boarder it.
- Triple-left-click with select tool will select all connected.
- Select left-to-right will select anything fully in the box; selecting right-to-left will select anything touching the box/line.
- Double-left-clicking will repeat the last operation.
Keyboard Shortcuts
- There are very little by way of default keyboard shortcuts but it is very easy to add your own via the Windows - Preferences menu item. Once you set things up, you can save them by exporting/importing your preference file. I find it helpful to set the alt-arrows to predefined views, L to open the layers window (L again will collapse but not close it … I drop all the collapsed windows over-top each other on an unused area of the menu bar), C for components, I for info, etc...
- The arrow keys constrain drawing and movement to one of the three axes. Up/Dn = blue, Left = green, Right = red
- When selecting the shift key toggles (selects/deselects) each time you click on something. The cntrl key enables unconditional multiple select. cntrl-shift select will always unselect.
- cntrl-T deselects all, though it will not stop editing a group/component. You can also just click on some empty space.
- Use the extrude tool to quickly highlight faces to reverse or delete. Just hover the tool over the face (NO clicking) and using shortcut keys "D" = delete, "R" = reverse face to either delete them or reverse them. The move tool will allow quick object deletes in a similar fashion.
- Several tools remember the last used value [during that session] - Offset and PushPull are the main ones.
- With scale, move, and rotate, typing in units (‘, cm, etc) will set to that value rather than adjusting by that value.
- Many of the drawing tools have associated keyboard keys that enable constraints on the tool. The cntr key cause some tools to make copies automatically, for example.
- When drawing, scaling or moving anything once you have started to make a move you can release the cursor and type in the required value and press enter to finish.
- Move Tricks:
- Make a copy or array of copies while moving:
- Move+ctrl to copy + typed 'dimension' +
moves the copy by that 'dimension'. - Immediately typing 10x [or 10* or x10 or *10 !] will copy 10 times, at that dimension each time.
- Alternatively immediately typing /10 will take the 'dimension' as the total distance and make 10 copies that are fitted into the distance, dividing the 'dimension' into 10 equal parts - great if you want to subdivide 7 3/16" into 3 parts.
- Eraser Tricks:
- Eraser+Ctrl 'softens' edges.
- Eraser+Shift 'hides' edges.
- Eraser+Ctrl+Shift unsoftens edges.
- To 'unhide' edges you have to use Entity Info or right-click context-menu 'unhide'...
- Scale Tricks:
- Typing units (10mm, cm, etc) into the scale tool will set length to that measurement rather than scaling.
- Cntl and Shift modify.
- Paint Tricks:
- Shift to paint all that match
- Ctrl to paint all connected
Methods
Inference
Inference is about SketchUp trying to figure out what you want to do and the inference engine is why SketchUp is so easy to use. However, it’s still a dumb computer program and sometimes it just can’t figure out what you want it to do. Thus, it helps to understand some inference engine basics.- Display Aids while using tools:
- Green dots = Endpoints
- Red dots = On an edge
- Cyan dots = Midpoints of edges
- Blue dots = On a surface
- Red line = X axis
- Green line = Y axis
- Blue line = Z axis
- Magenta line = something is parallel or perpendicular to an edge. Also, if drawing across a corner, the line or arc will change to this colour if the ends are an equal distance from the corner.
- Using inference locking:
- When using a tool that won’t infer what you want, rotating for example, find (or even temporarily draw) another object that will allow that inference.
- Hold SHIFT to capture and lock that inference.
- Then go back to the object you want to work with.
- Drawing plane
- if the ground covers most of the view then objects are drawn on the X/Y axis
- if the sky covers most of the view then objects are drawn on the Z axis
- When trying to snap to the center of a circle or arc, running the tool around the circumference will tell the inference engine what you want.
Layers
- Layers are for hiding components in different scenes.
- Conventional wisdom is to always draw on layer 0 then create components/groups and move them to other layers if desired. This is because layer 0 is special in that components on other layers will always show layer 0 items if the other layer is shown. Each item in a group or component has its own layer setting. Thus, it is possible to put individual items on other layers and then hid it. This will result in the component not showing those items on the hidden layer.
Scenes
- Scenes will print as pages of output. Thus, scenes define the final paper report of the model. It is very useful when you want a bunch of dimensioned parts to build from. Simply make a scene for each page you want printed. If you want the standard 3-view (top/front/side) 2D representation of a part on a single scene (page), then use the CADup plugin.
- Layers are typically used to define what objects are shown on a given scene.
- By selectively hiding objects, you can create two scenes that show doors, one open the other closed. Simply have 2 instances of the same door component, both opened and closed, and hide the one you don’t want to see on each scene. You could also use layers; open in one, closed in another; to set each scene. You can also use a scalable dynamic door in one scene. (Note: “Another Dynamic Door” from the warehouse is a good one)
- If you create a scene, it will keep hidden objects set at the last update. Thus, if you hide a bunch of objects to work on something but don’t update the scene, you can get back to only the hidden objects you want by simply re-choosing the scene.
Components and Groups
- Both allow items to move together and not distort when attached feature (not in the component or group) are moved.
- Both can be copied and pasted like anything else.
- All instances of a component are the same. If you edit one, all will change. Groups are individual.
- Components are available in the component library, can be saved as their own model, and can be shared by uploading to the SketchUp warehouse.
- You can edit a component or group by double-left-clicking with the select tool, or via the right-click context menu.
Copy and Paste
- The clipboard survives the undo function up to and including the entire model.
- Under the Edit menu, there is a “Paste in Place” command that will paste the clipboard contents back where they were cut from. It is very handy and deserves a keyboard shortcut.
- If you draw something on a group/component that is closed, either because you forgot or because it allows you to draw without interacting with the group contents while still having the snaps work, you can cut these new items, open the group/component for editing, and Paste in Place.
Lines
- When drawing lines that need to be the same length as other lines that are parallel or perpendicular, after you have started the line place the cursor on the endpoint you wish to match and the inference engine will then snap to it, parallel to it or perpendicular to it.
Circles, Arc, and Tapers
- You can edit the diameter of circles and arcs by typing in changes in the entity window. The circle or arc must be the only item selected. You can make tapers this way by adjusting one of the circle-ends of a cylinder.
- If you are trying to find the center of an arc or circle run the cursor along the edge of the circle. That tells the inference engine what you need and it will then snap to the centre of the circle.
- When you select the circle tool the default number of segments used to create the circle is 24. You may at that time enter any other amount greater than 2 on the keyboard and press enter. That will become the new default for circles for the rest of the session. This also applies separately to the arc tool. A moment of thought and it becomes clear that this allows you to make any regular polygon from a triangle on up.
Rotation
- When rotating, if your mouse pointer is inside the rotation indicator, it will snap.
- You can distort objects by using the rotate tool on an ungrouped and unselected object.
- If you select a face you can rotate that face and edges of that face. You can use that to twist everything connected to that face.
- The copy 10x (number x) command also works with the rotate tool to make polar arrays.
Push/Pull
- When using the push/pull (extrude) tool you can reference it to any other surface or edge that the cursor can reach in the entire drawing area. That will instantly snap the extrude to that length.
- The push/pull tool may be used on any face that isn't a smoothed surface. If the face is smoothed it must be un-smoothed first.
- If any face is made exactly coincident with another face both will be deleted. This is useful when making holes.
- When pushing faces if the ctrl key is tapped the original face will remain in place and a new face will be created that is moved.
Tape Measure
- It will make guides/points if it shows ‘+’. Toggle this with the cntrl key.
- Starting from along a line will make a parallel infinite guide.
- Starting from an end-point will make a line to a guide point in the mouse direction.
- Use the construction line tool to set up snap lines in advance. It has a few nice features. The first time you set up a snap line you type in the length from the keyboard and press enter. The line moves to that position. Subsequent uses of the tool will automatically snap to that previous value which make setting up more similar snap lines trivial.
- Scale with Tape Measure by measuring a line and then typing in a value. It will prompt to scale the whole model. If editing a group or component, it will prompt to scale that.
Moving
- While moving the movement may be constrained by the arrow keys.
- If you don’t want shapes touching an object you want to move to deform, make them a group first.
- If nothing is selected before choosing the move tool, it will pre-select as you move over an object.
- The move tool, with nothing selected, makes a handy quick-delete tool. Just let things get pre-selected and then hit delete. No clicking necessary.
- Accurately position by grabbing end-points or corners that can be snapped to other features or construction points.
- Within a shape, individual lines may be selected. If the line is then grabbed at the centre point it will deform the object along constraints that you choose and/or along constraints that don't required new lines to be created. For example, a cube may be deformed to any prism. You can also adjust the length of a beam that includes features on the end by selecting all the features that make up the end and moving that along the beam length.
- Grabbing a vertice will deform the object and the sides that meet at the vertice.
- Selecting and moving faces will deform the object accordingly.
- When moving, if any edges or faces become coincident it will become a single edge or face.
Arrays
- Arrays are made by using the move tool or the rotate tool to make the first copy. Once it is made you type in the number of additional copies followed by the letter x ( example 200x) and it will make linear or polar arrays automatically. The value includes the first copy you made but not the original.
Lathing via the Follow-Me Tool
- Create a 2D circle.
- Create a 2D profile that is perpendicular to this circle. If it is touching the circle, the result will be a cup, if it is not touching, the result will be a solid or pipe.
- If the profile extends to the center of the circle, the cylinder will be solid. If not, it will be a pipe.
- Select the circle (outer line, not the face).
- Chose the follow-me tool.
- Click on the profile face.
- SketchUp should now automatically create a cylinder with the profile specified.
- You can delete the circle if desired.
Rounding Edges
- Rounding the edges is easy on one face:
- draw an arc on a perpendicular face
- select the target face (double-click to select the lines around it)
- use the Follow Me tool to carry the perpendicular arc around the face.
- however, if you then try to round a perpendicular face, it won’t work the way you would expect, say, a router bit to double-profile.
- Rounding perpendicular faces:
- The manual way:
- start by making groups or components that match the profile you want:
- draw a circle with the desired radius
- extrude it into a cylinder
- divide the circle into 4 quadrants
- copy and paste it 3 times
- on each of the 4 copies, extrude away 3 of the 4 segments
- group each quarter-round
- select all 4 groups, copy and paste 2 times
- rotate each of the 2 groups around an axis
- the result will be 12 groups, representing all possible corners in 3D
- you can then export these to a component and separate model if you want. You can build up selections the way you would a router bit collection
- Apply the profile to the corners:
- on each corner, paste a copy of the profile group that matches
- explode the profile and the target
- select all (triple-left-clicking with the select tool will do it)
- in the context menu, use Intersect Faces - Model
- use the eraser tool to remove everything not wanted
- the result will be rounded corners, including the perpendicular intersects, where desired
- There is a plugin called RoundCorner that is suppose to do this automatically (and more) but it won’t load in SketchUp running under wine (at least on my computer). However, the above technique allows custom profiles if desired.
Viewing
- You can turn off viewing component axis indicators in the Windows - Model Info - Components dialog. These get turned on by the Align_2D plugin.
- If you use one of the ‘Engineering’ styles in a scene, you can get a white background. This will make for better dimension printouts.
Faces
- Each surface has 2 faces, an outside and an inside. They need to be kept that way, especially if you plan on exporting the model to some other application.
- Inside faces are blue (by default) and sometimes during editing they can wind up on the outside.
- You can flip the face by selecting the face and hitting ‘R’ to reverse it. There is also an Align Faces tool you can use if there are a lot of them.
- the Entity Info window SketchUp puts a "solid" in front of the group's name to indicate, when an object is indeed solid.
Smoothing
- Internal faces will produce invisible edges on a surface to be smoothed. Deleting internal faces will remove those external edges so the area may be smoothed.
- Smoothing is a visual effect only. It doesn't change the underlying geometry. As a result, shadows cast by a smoothed surface will reflect the actual geometry, not the smoothed appearance.
Dynamic Components
- Only the Pro version can create dynamic components
- The free version can use and interact with dynamic components
- Some dynamic components are scalable
- You can take a simple dynamic door from the warehouse and scale/rotate/flip to work as any door. “Another Dynamic Door” is a good door to work with as it’s very simple and works.
Useful Plugins
Utilities
Stock routine, adds two commands under Tools - Utilities:- Create face:
Select the contiguous edges where you want a face and then select this tool. It will create the face. - Query tool:
Displays information on anything you hover over.
SKP_to_DXF
Exports to CAD- from: http://www.guitar-list.com/download-software/convert-sketchup-skp-files-dxf-or-stl
Unfold Tool
Unfolds surfaces for paper or sheetmetal work. Located in Plugins - Unfold Tool. Select tool, left-click on a face, then another connected face. It will flatten the joint between the two. Repeat until you have a flat sheet.- from: http://sketchuptips.blogspot.com/2007/08/plugin-unfoldrb.html
Rotate 90
Rotates the selected object 90 degrees around the Z axis. Select a group/component and then Context Menu - Rotate 90 around Z.- from: http://rhin.crai.archi.fr/rld/plugin_details.php?id=345
Mover2
Gives a high degree of control over moving a group/component, including set to origin and Zero on Z axis. Has many other options. Plugins - Mover2 for the dialog box.Get Dimensions
Returns the dimensions of a selected object. Select object then Plugins - Get Dimensions.- From: http://rhin.crai.archi.fr/rld/plugin_details.php?id=158
Joint Push/Pull
Variations on the Extrude tool that can work with multiple faces. It has its own toolbar as well as being under the Tools - Joint Push Pull, and in the context menu. It has 3 variations:- Normal - same as Extrude tool.
- Joint - Works like extrude tool except it will leave faces at edges.
- Vector - Will extrude at an angle to selected face.
- from: http://forums.sketchucation.com/viewtopic.php?f=323&t=6708
Point At Center
Default in SketchUp install - via ContextMenu plugin. Adds Point At Center to context menu when a circle or arc is selected. Adds a construction point.- from: just move it from the Examples folder
Construction Line Tool
Create construction lines the same way you draw regular lines (instead of using the tape measure tool). Has a toolbar as well as being under Draw - Construction Line- from: http://sketchuptips.blogspot.com/2008/02/plugin-construction-line-tool.html
Selection Memory
Creates a calculator like memory for selections. Options are:- MS = memory set
- MR = memory recall
- M+ = memory add
- M- = memory subtract
- from: http://sketchuptips.blogspot.com/2008/01/plugin-selection-memory.html
Align_2D
Moves all selected items to same 2D plane. Available under Tools - Align 2D. Note that this tool enables component axis display. You can turn it back off with Windows - Model Info - Components dialog.- from: http://rhin.crai.archi.fr/rld/plugin_details.php?id=12
CADup
Used to generate 2D representations of components or groups. Good for creating dimensioned drawings. Available under Tools - CADup.- from: http://forums.sketchucation.com/viewtopic.php?f=323&t=35096&sid=222dae16db08381719efab02a0ce7bb4
Workflow:
- Make sure the origin area of your drawing is clear. This is where CADup will place its output.
- Select and copy the items you want flattened in this particular view.
- Paste them in an empty area.
- Explode all items, repeat until there is nothing left to explode. This is not necessary if you are only dealing with a single component or group and there are no sub-components or groups nested inside it.
- Make the items a group (selected).
- Run the CADup tool. It will create a 2D object at the origin (hint, use the top view).
- Delete the group created.
- Select this object - and edit it.
- Move or delete the items in it as desired.
- Dimension as required.
- Move dimensions into individual CADup groups such that they can be moved to make a better printout.
- Define a scene for each component group you want printed.
Weld
Unexplodes a circle. Located under the plugins menu.from: http://www.smustard.com/script/Weld
My Install
This is just what I do. It’s not meant to be some definitive standard. Also, I run Ubuntu Linux so I’m running SketchUp under WINE. It seems fine, though there are a few odd bits. Current version, when I last updated this, was SketchUp v8 standard (not Pro).Installing and Running Under WINE
- After installing WINE, download both Google Sketchup and the SketchyPhysics plugin (if desired). Right-click on the files and “run under wine”. Point SketchyPhysics to the right plugin folder.
- bug 14045: If you get the error "SketchUp was unable to initialize OpenGL!, run regedit (from the terminal type: wine regedit), open [HKEY_CURRENT_USER\Software\Google\SketchUp8\GLConfig\Display], and change "HW_OK" to 1.
- This is from: http://wiki.winehq.org/GoogleSketchup
- SketchyPhysics bug:
“Error Loading File SketchyPhysics.rb undefined method `file_loaded?' for main: Object” - copy sketchup.rb from Tools folder to Plugins folder
- edit sketchyphysics.rb from Plugins folder and add this line at the beginning of the file: load "sketchup.rb"
- This is from: http://code.google.com/p/sketchyphysics/issues/detail?id=9
- Printing issue: I get a blank page unless I “enable high accuracy HLR” in the print window. I’m printing to PDF file typically. Also, I can’t get the export 2D graphics to work at all.
- I also have an issue with an old HP printer that won’t print dimension numbers. Something about the font that I’ve not figured out. The workaround for this is to print to PDF, import the PDF into the GIMP as images (not layers), and then print each page there. That works fine as the text gets converted to graphics.
- Display
update issue. On another system, I ran into an issue where the display
would not update until the next command. This is a problem.
There are now 2 solutions to this: - Solution 1: Starting with the following command line:
vblank_mode=0 wine "/home/fixerdave/.wine/dosdevices/c:/Program Files/Google/Google SketchUp 8/SketchUp.exe"
(source: gmharris http://ubuntuforums.org/showthread.php?p=11980351#post11980351)
To use the above in a launcher you need to (same as below) create a file somewhere in the path with the above as contents, make it executable, and then point the launcher (type = application) at that file. - Solution 2: A startup script as follows:
(source: an anonymous comment on ubuntu-linux-sketchup-using-wine)
#! /bin/bash
# Uses xrefresh launched repeatedly using watch within an iconified xterm
# to force Google Sketchup to redraw every 0.3 seconds...
# Stores the PID and kills the xterm on exit from Sketchup!
# Note that I needed to install xterm as well
xterm -iconic -title "Sketchup Refresher (xterm)" -e "watch -n 0.3 xrefresh -geometry 1x1+500+500" & watchPID=$!
echo $watchPID
env WINEPREFIX="/home/username/.wine" wine "/home/username/.wine/dosdevices/c:/Program Files (x86)/Google/Google SketchUp 8/SketchUp.exe"
kill $watchPID
# Uses xrefresh launched repeatedly using watch within an iconified xterm
# to force Google Sketchup to redraw every 0.3 seconds...
# Stores the PID and kills the xterm on exit from Sketchup!
# Note that I needed to install xterm as well
xterm -iconic -title "Sketchup Refresher (xterm)" -e "watch -n 0.3 xrefresh -geometry 1x1+500+500" & watchPID=$!
echo $watchPID
env WINEPREFIX="/home/username/.wine" wine "/home/username/.wine/dosdevices/c:/Program Files (x86)/Google/Google SketchUp 8/SketchUp.exe"
kill $watchPID
Use as follows:
- Create a text file with the above lines.
- In Properties for this file, mark it as executable
- In System - Preferences - Main Menu, create a new launcher that points to this file.
It’s not pretty, but it works well enough as of Mint 15 and SketchUp v8
- Scene update crashes:
- Turning off - Use Scene Thumbnails resolves this.
My Preferences:
- Install SketchyPhysics - disable until needed.
- Install standard plugins.
- Import preferences file.
- Enable Toolbars:
- Large toolset
- Measurements
- Standard
- Move Measurements and all plugin toolbars to top
Sources:
- Evan, from the Home Shop Machinist Net:http://bbs.homeshopmachinist.net
- Various Authors on The Duh! (Do’h!) Thread of SkechUcationhttp://forums.sketchucation.com/viewtopic.php?f=15&t=17315
- Mike Bailey's SketchUp Pagehttp://web.engr.oregonstate.edu/~mjb/sketchup/
- Comments on: Ubuntu Linux Sketchup using Winehttp://credentiality2.blogspot.com/2010/04/ubuntu-linux-sketchup-using-wine.html
- Google online SketchUp help.
- My own experimenting.
Subscribe to:
Posts (Atom)
